
📝 After completing this theory chapter, you should be able to:
- Describe the ways to make a Container Image: from a Dockerfile or from Instance Promotion
- Explain the different keywords in a Dockerfile: FROM, RUN, ... etc
- Describe how image layers and caching work and contribute during the Docker build process
- Create a Dockerfile when given the base image, application location, ...
Dockerfiles, the blueprints
In the previous chapter you pulled down images from Docker Hub to run as your containers. Then you noted how each instance was isolated from the others. We hinted that this is used in many production IT environments every day but obviously we need a few more tools in our belt to get to the point where Docker can become a true time & money saver.
First thing you may want to do is figure out how to create our own images. While there are over 700K images on Docker Hub it is almost certain that none of them are exactly what you run in your data center today. Even something as common as a Linux OS image would get its own tweaks before you actually run it in production. Peviously we created a file called “hello.txt” in one of our container instances. If that instance of our Alpine container was something we wanted to re-use in future containers and share with others, we would need to create a custom image that everyone could use.
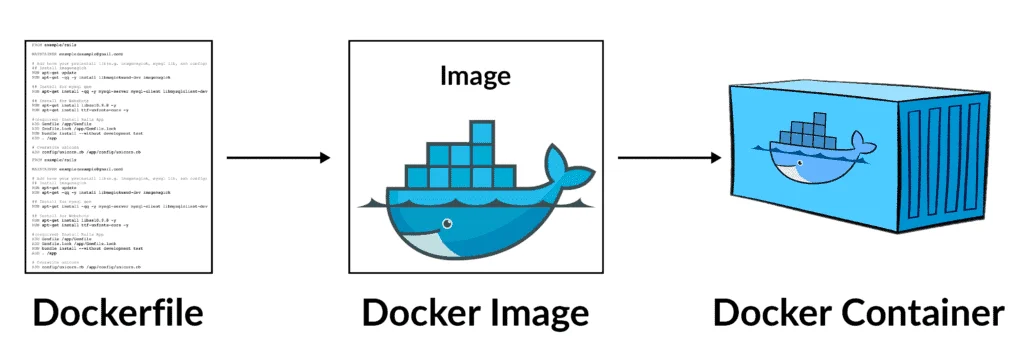
We will start with the simplest form of image creation, in which we simply commit one of our container instances as an image.
Then we will explore a much more powerful and useful method for creating images: the Dockerfile.
After that we will see how to get the details of an image through the inspection and explore the filesystem to have a better understanding of what happens under the hood.
🛠 Image creation from a container
As said in the intro we will start with the simplest form of image creation, in which we simply commit one of our container instances as an image.
A custom Ubuntu image with figlet
 Let’s start by running an interactive shell in a ubuntu container:
docker run -it ubuntu bashAs you know from earlier labs, you just grabbed the image called ubuntu from Docker Hub and are now running the bash shell inside that container.
To customize things a little bit we will install a package called figlet in this container. Your container should still be running so type the following commands at your ubuntu container command line:
apt-get update
apt-get install -y figlet
figlet "hello docker"
You should see the words “hello docker” printed out in large ascii characters on the screen. Go ahead and exit from this container
exitNow let us pretend this new figlet application is quite useful and you want to share it with the rest of your team. You could tell them to do exactly what you did above and install figlet in to their own container, which is simple enough in this example. But if this was a real world application where you had just installed several packages and run through a number of configuration steps the process could get cumbersome and become quite error prone. Instead, it would be easier to create an image you can share with your team.
To start, we need to get the ID of this container using the ps command (do not forget the -a option as the non running container are not returned by the ps command).
docker ps -aBefore we create our own image, we might want to inspect all the changes we made. Try typing the command docker diff CONTAINER_ID for the container you just created. You should see a list of all the files that were added to or changed in the container when you installed figlet. Docker keeps track of all of this information for us. This is part of the layer concept we will explore in a few minutes.
Now, to create an image we need to commit this container. Commit creates an image locally on the system running the Docker engine. Run the following command, using the container ID you retrieved, in order to commit the container and create an image out of it.
docker commit CONTAINER_IDThat’s it - you have created your first image! Once it has been commited, we can see the newly created image in the list of available images.
docker image ls -aYou should see something like this:
IMAGE                               ID             DISK USAGE   CONTENT SIZE   EXTRA
ubuntu:latest                       d1e2e92c075e        117MB         31.7MB    U
<untagged>                          ea74ccdc5b50        217MB         71.1MB
Note that the image we pulled down in the first step ubuntu is listed here along with our own custom image. Except our custom image has no information in the REPOSITORY or TAG columns, which would make it tough to identify exactly what was in this container if we wanted to share amongst multiple team members.
Adding this information to an image is known as naming or tagging an image. From the previous command, get the ID of the newly created image and tag it so it’s named ourfiglet:
docker image tag IMAGE_ID ourfiglet
docker image ls
Now we have the more friendly name ourfiglet that we can use to identify our image.
IMAGE                               ID             DISK USAGE   CONTENT SIZE   EXTRA
ourfiglet:latest                    1fd473b5fc65        217MB         71.1MB
ubuntu:latest                       d1e2e92c075e        117MB         31.7MB    U
Here is a graphical view of what we just completed:

Now we will run a container based on the newly created ourfiglet image:
docker run ourfiglet figlet helloAs the figlet package is present in our ourfiglet image, the command returns the following output:
 _          _ _
| |__   ___| | | ___
| '_ \ / _ \ | |/ _ \
| | | |  __/ | | (_) |
|_| |_|\___|_|_|\___/
A custom Python 🐍 image with Python program
![]() Let's now try the same thing with a more familiar subject. First of all run a container that has Python already pre-installed and start an interactive shell:
Let's now try the same thing with a more familiar subject. First of all run a container that has Python already pre-installed and start an interactive shell:
docker run -it python:3.9-slim bashWe will copy the following Python code inside the container. To make that happen create a file pyramid.py in a folder on your computer:
for i in range(1, 6):
    for x in range(1, i + 1):
        print(x, end="")
    print()

# Tweede helft van het patroon
for i in range(4, 0, -1):
    for x in range(1, i + 1):
        print(x, end="")
    print()
After that copy the file into the container via a new CLI window:
docker cp pyramid.py <container_id>:/script.pyReplace the <container_id> with the id of the python container you just ran. You can find this id using the docker ps command.
Back inside the container, check if the script is present:
ls /script.pyThen run the script:
python /script.pyIf this all works you can commit the current container to a new container image:
docker commit <container_id> my-python-imageFinally, test the image:
docker run -it my-python-image python /script.pyAs mentioned above, this approach of manually installing software in a container and then committing it to a custom image is just one way to create an image. It works fine and is quite common. However, there is a more powerful way to create images. In the following part we will see how images are created using a Dockerfile.
🛠 Image creation using a Dockerfile
![]() Instead of creating a static binary image, we can use a file called a Dockerfile to create an image. The final result is essentially the same, but with a Dockerfile we are supplying the instructions for building the image, rather than just the raw binary files. This is useful because it becomes much easier to manage changes, especially as your images get bigger and more complex.
Instead of creating a static binary image, we can use a file called a Dockerfile to create an image. The final result is essentially the same, but with a Dockerfile we are supplying the instructions for building the image, rather than just the raw binary files. This is useful because it becomes much easier to manage changes, especially as your images get bigger and more complex.
Ourfiglet through a Dockerfile
To start off we will recreate the ourfiglet image but now through using a Dockerfile.
We went through two steps to get to the container which we wanted to create an image from.
First starting from a ubuntu base image:
docker run -it ubuntu bashThen installing figlet:
apt-get update
apt-get install -y figlet
When we recreate this image through using a Dockerfile, the contents of this Dockerfile will describe the same steps.
Create a file named Dockerfile (no file extension) and copy the following content into it.
FROM ubuntu
RUN apt-get update && apt-get install -y figlet
This Dockerfile does the following:
FROM ubuntu:FROMspecifies the base image to use as the starting point for this new image you’re creating. For this example we’re starting fromubuntu, as we did previously.RUN apt-get update && apt-get install -y figlet:RUNexecutes a command in the image, which updates the package manager and installsfiglet. Of course this command is run only once when the container image is created, not every time an existing container is (re-)started.
The same steps are taken, but now just in the correct syntax for a Dockerfile.
Now we still need to turn the Dockerfile into an image with the docker build command. In this command the -t is used to give the image a name. The . reflects where the command needs to go look for the Dockerfile, in this case the current folder:
docker build -t ourfiglet .After we enter the command we can see the build process happening:
[+] Building 9.9s (6/6) FINISHED
 => [internal] load build definition from Dockerfile                                                               0.0s
 => => transferring dockerfile: 97B                                                                                0.0s
 => [internal] load .dockerignore                                                                                  0.0s
 => => transferring context: 2B                                                                                    0.0s
 => [internal] load metadata for docker.io/library/ubuntu:latest                                                   0.0s
 => [1/2] FROM docker.io/library/ubuntu                                                                            0.0s
 => [2/2] RUN apt-get update && apt-get install -y figlet                                                          9.6s
 => exporting to image                                                                                             0.2s
 => => exporting layers                                                                                            0.2s
 => => writing image sha256:978bb47ecbca116a966abc85da4513b44fc7e9dbcefd0a305ca96e53b67a8f1a                       0.0s
 => => naming to docker.io/library/ourfiglet
We can test the image again with the same command as we used before to start a container instace of our image:
docker run ourfiglet figlet helloPyramid python image through a Dockerfile
We now also recreate the pyramid Python image through using a Dockerfile..
Create another file named Dockerfile (no file extension) and copy the following content into it:
FROM python:3.9-slim
COPY pyramid.py /app/pyramid.py
WORKDIR /app
CMD ["python", "pyramid.py"]
# OR
# ENTRYPOINT ["python", "pyramid.py"]
You should now have the following folder content:
📂folder
├── 📄pyramid.py
└── 📄Dockerfile
The above Dockerfile does the following:
FROM python:3.9-slim:FROMonce again specifies the base image to use as the starting point for this new image. As before this is an image with Python pre-installed.COPY pyramid.py /app:COPYcopies thepyramid.pyfile from the current directory of the Docker host into the image, at the/applocation.WORKDIR /app:WORKDIRsets the working directory for the image, which means that any subsequent commands will be executed from this directory. In this example,WORKDIRis used to change the current directory to/app, where thepyramid.pyfile is located.CMD ["python", "pyramid.py"]:CMDspecifies what command to run when a container is started from the image. Notice that we can specify the command, as well as run-time arguments. In this example,CMDis used to run thepythoncommand with thepyramid.pyfile as an argument. This will execute the Python code in thepyramid.pyfile.
Once again, turn the Dockerfile into an image with the docker build command:
docker build -t python-pattern .Then we can test:
docker run python-patternA Javascript NodeJS app
Next up, we will use an example in this section and build a slightly more complicated Dockerfile with a “hello world” application in Node.js that combines commands from the previous two examples. Do not be concerned if you are not familiar with Node.js: Docker (and this exercise) does not require you to know all these details.
What is NodeJS?
![]() NodeJS is a runtime environment that allows you to run JavaScript code outside of a web browser. It is based on the Google Chrome V8 JavaScript engine, which can execute JavaScript very fast. NodeJS is often used for building scalable and data-intensive web applications, such as streaming and real-time apps.
NodeJS is a runtime environment that allows you to run JavaScript code outside of a web browser. It is based on the Google Chrome V8 JavaScript engine, which can execute JavaScript very fast. NodeJS is often used for building scalable and data-intensive web applications, such as streaming and real-time apps.
We will start by creating a Javascript file in which we retrieve the hostname and display it.
INFO
You should be at the Docker host’s command line ($). If you see a command line that looks similar to root@abcd1234567:/# then you are probably still inside your ubuntu container from the previous exercise. Type exit to return to the host command line.
Type the following content into a new file named index.js:
var os = require("os");
var hostname = os.hostname();
console.log("hello from " + hostname);
The file we just created is the javascript code for our server. As you can probably guess, Node.js will simply print out a “hello” message. We will container-ize this application by creating a Dockerfile where we will:
- use
alpineas the base OS image - add a Node.js runtime
- copy our source code in to the container
- specify the default command to be run upon container creation
Create a file named Dockerfile in the same folder as the index.js file and copy the following content into it:
FROM alpine
RUN apk update && apk add nodejs
COPY . /app
WORKDIR /app
CMD ["node","index.js"]
This Dockerfile does the following:
FROM alpine:FROMspecifies the base image to use as the starting point for this new image you’re creating. For this example we’re starting fromalpine:latest, which is a minimal Linux distribution.RUN apk update && apk add nodejs:RUNexecutes a command in the image, which updates the package manager and installs nodejs. Of course this command is run only once when the container image is created, not every time an existing container is (re-)started.COPY . /app:COPYcopies file(s) from the current directory of the Docker host into the image, at the/applocation. In this example,COPYis used to copy theindex.jsfile and any other files in the same directory into the image.WORKDIR /app:WORKDIRsets the working directory for the image, which means that any subsequent commands will be executed from this directory. In this example,WORKDIRis used to change the current directory to/app, where theindex.jsfile is located.CMD ["node","index.js"]:CMDspecifies what command to run when a container is started from the image. Notice that we can specify the command, as well as run-time arguments. In this example,CMDis used to run thenodecommand with theindex.jsfile as an argument. This will execute the JavaScript code in theindex.jsfile, which prints "hello from " followed by the hostname of the container.
We now end up with the following folder:
📂folder
├── 📄index.js
└── 📄Dockerfile
Build the image out of this Dockerfile and name it hello:v0.1:
docker build -t hello:v0.1 .The part after the : in is the tag of the image. A tag is a label that identifies a specific version of an image. By default, the tag is latest, which means the most recent version of the image. However, you can specify a different tag to run a container from a specific version of an image. For example, hello:v0.1 means the image named hello with the tag v0.1.
This is what you just completed:

We then start a container to check that our application runs correctly:
docker container run hello:v0.1You should then have an output similar to the following one (the ID will be different though).
hello from 92d79b6de29fThe Dockerfile allows us to specify how to build a container image so that we can repeat those steps precisely everytime and we can specify what the container should do when it runs. There are actually multiple methods for specifying the commands and accepting parameters a container will use, but for now it is enough to know that you have the tools to create some pretty powerful containers.
A static website on Nginx and pushing to Docker Hub
![]() The previous sections show that we can use an image we created ourselves just as we would for images pulled down from Docker Hub. We still have a slight issue in that our image is only stored locally. To share the image we would want to push the image to a registry somewhere like to Docker Hub.
The previous sections show that we can use an image we created ourselves just as we would for images pulled down from Docker Hub. We still have a slight issue in that our image is only stored locally. To share the image we would want to push the image to a registry somewhere like to Docker Hub.
In this task, we’re going to create a simple NGINX website container image from a Dockerfile and also push it to our own Docker Hub account.
Create a new folder and make the following HTML file (called index.html) in it:
<html>
    <head>
        <style>
        body {
        	background-image: linear-gradient(-74deg, transparent 90%, rgba(255, 255, 255, 0.23) 20%),
                              linear-gradient(-74deg, transparent 83%, rgba(255, 255, 255, 0.18) 15%),
                              linear-gradient(-74deg, transparent 76%, rgba(255, 255, 255, 0.1) 15%),
                              linear-gradient(to top, #127ab1, #1799e0, #1796db);
    		background-size: cover;
    		margin-bottom: 0px!important;
        }
        div{
            font-family: 'Geomanist', sans-serif;
  			font-weight: normal;
  			color: white;
            width: 50%;
            margin: 0 auto;
            position: relative;
            top: 30%;
            transform: translateY(-50%);
        }
        </style>
    </head>
    <body>
        <div class="inner">
            <center>
                <h1>Welcome!</h1>
                <img src="./logoimage.png"*>
                    <p>
                    You've successfully deployed the containerized website!
                    <p>
           </center>
        </div>
    </body>
</html>
Make sure to download this image and put it alongside the HTML file in the folder.
Create a Dockerfile with the following contents:
FROM nginx:latest
COPY index.html /usr/share/nginx/html
COPY logoimage.png /usr/share/nginx/html
EXPOSE 80 443
CMD ["nginx", "-g", "daemon off;"]
Let’s see what each of these lines in the Dockerfile do.
FROMspecifies the base image to use as the starting point for this new image you’re creating. For this example we’re starting fromnginx:latest, which an Alpine Linux base image with nginx installed.COPYcopies files from the Docker host into the image, at a known location. In this example,COPYis used to copy two files into the image:index.htmland an image that will be used on our webpage.EXPOSEdocuments which ports the application uses. But does not actually expose any ports. You will need to do this when you actually run the container. Port80deals with unencrypted HTTP web requests to the server and port443would deal with encrypted HTTPS web requests.CMDspecifies what command to run when a container is started from the image. Notice that we can specify the command, as well as run-time arguments.
We now end up with the following folder:
📂folder
├── 📄logoimage.png
├── 📄index.html
└── 📄Dockerfile
This time around we will also push the image to our own Docker Hub repository page so that it is publically available for download and usage. To make this happen we need to make sure that the image name and tag also includes our own Docker Hub ID.

To get our own Docker Hub ID we need to sign up at Docker Hub. The account you perhaps made during the installation of Docker Desktop is the same account. Your username on Docker Hub is your DOCKER ID.
The build command will turn into the following, replace YOUR_DOCKER_ID with your own Docker ID (Docker Hub username):
docker build -t YOUR_DOCKER_ID/testwebsite:latest .In this command:
-tallows us to give the image a custom name. In this case it’s comprised of our Docker ID, the name, and a version. Having the Docker ID attached to the name will allow us to store it on Docker Hub in a later step. -.tells Docker to use the current directory as the build context.
The output below shows the Docker daemon executing each line in the Dockerfile:
Sending build context to Docker daemon  32.77kB
Step 1/5 : FROM nginx:latest
latest: Pulling from library/nginx
afeb2bfd31c0: Pull complete
7ff5d10493db: Pull complete
d2562f1ae1d0: Pull complete
Digest:sha256:af32e714a9cc3157157374e68c818b05ebe9e0737aac06b55a09da374209af9
Status: Downloaded newer image for nginx:latest
---> da5939581ac8
Step 2/5 : COPY index.html /usr/share/nginx/html
---> eba2eec2bea9
Step 3/5 : COPY logoimage.png /usr/share/nginx/html
---> 4d080f499b53
Step 4/5 : EXPOSE 80 443
---> Running in 47232cb5699f
---> 74c968a9165f
Removing intermediate container 47232cb5699f
Step 5/5 : CMD nginx -g daemon off;
---> Running in 4623761274ac
---> 12045a0df899
Removing intermediate container 4623761274ac
Successfully built 12045a0df899
Successfully tagged YOUR_DOCKER_ID/testwebsite:latest
Use the docker run command to start a new container from the image you created:
docker run -d -p 8080:80 --name testwebsite YOUR_DOCKER_ID/testwebsite:latestAs this container will be running an NGINX web server, we’ll use the -p flag to publish port 80 inside the container onto port 8080 on the host. This will allow traffic coming in to the Docker host (your laptop) on port 8080 to be directed to port 80 in the container. Remember, the format of the -p flag is host_port:container_port.
Navigate to http://localhost:8080 to load the website which should be running. Once you’ve accessed your website, shut the container down and remove it.
Now we will push our image to Docker Hub.
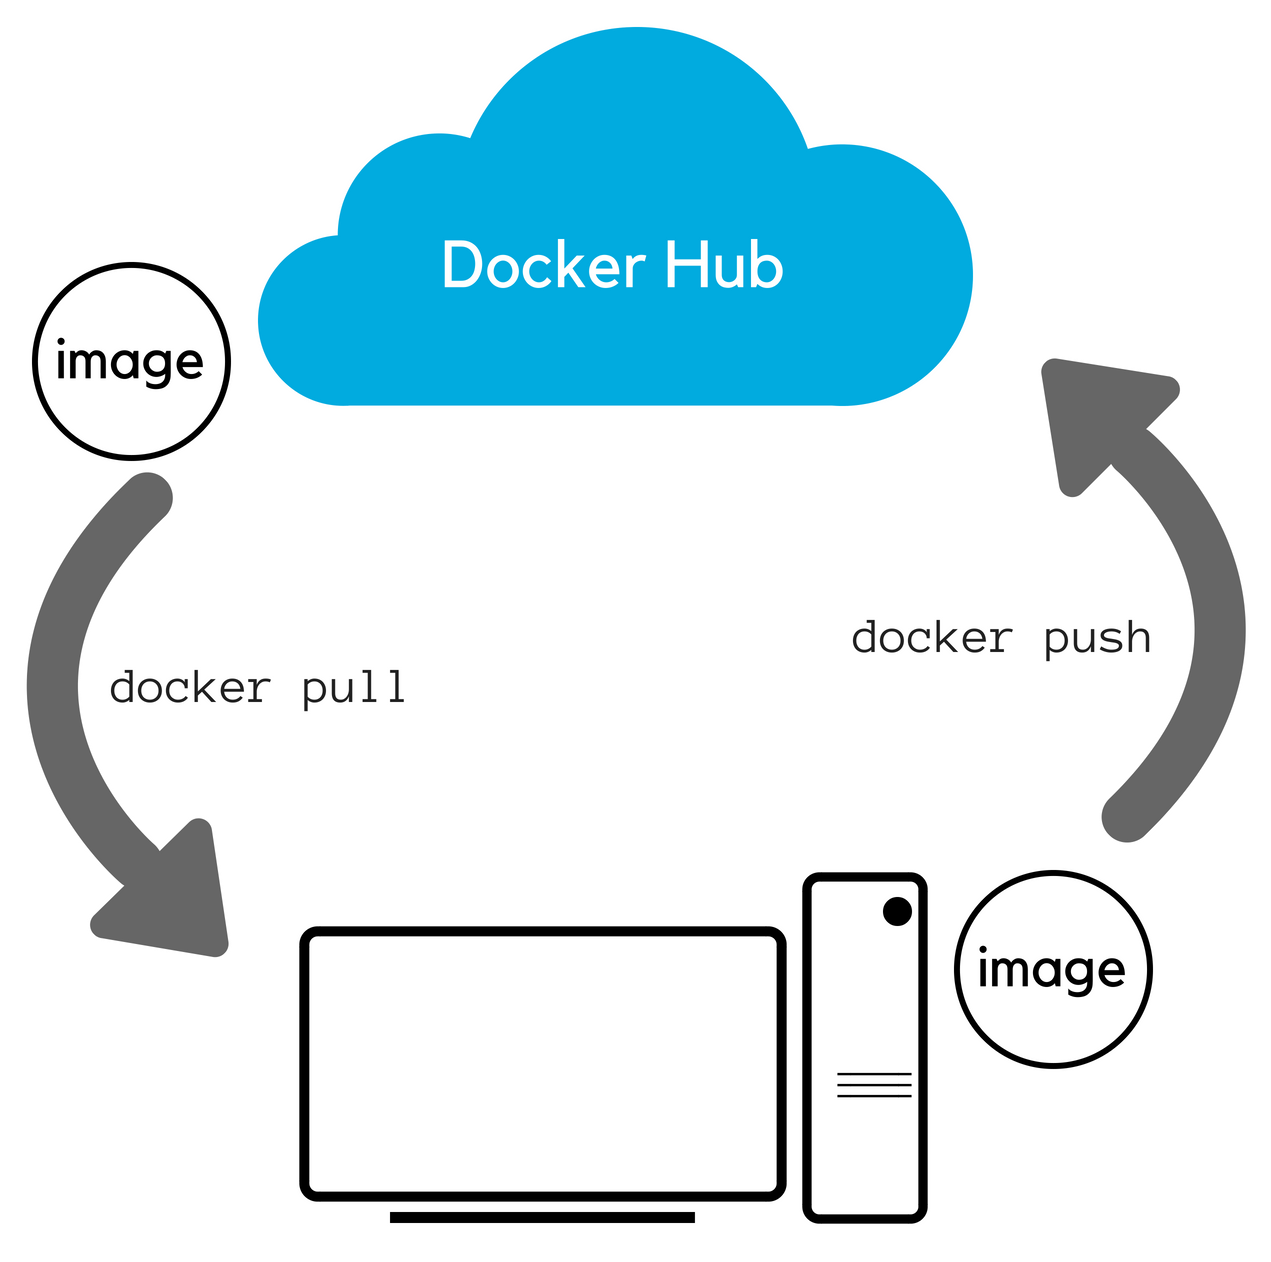
First of all we will need to docker login to Docker Hub with our command line:
docker login -u YOUR_DOCKER_ID -p YOUR_PASSWORDAfter that we can docker push the image to our Docker Hub account. It will automatically be placed into our account thanks to us logging in and using our Docker ID in the image tag.
docker push YOUR_DOCKER_ID/testwebsite:latestBecause the image tag has the suffix :latest it will overwrite the "latest" version of your image. People that download this image will assume that this is the latest version. You can also work with different version numbers as we did in previous parts.
🛠 Image layers, caching and inspection
 There is something else interesting about the images we build with Docker. When running they appear to be a single OS and application. But the images themselves are actually built in layers. If you scroll back and look at the output from your
 docker build command you will notice that there were 5 steps and each step had several tasks. You should see several “fetch” and “pull” tasks where Docker is grabbing various bits from Docker Store or other places. These bits were used to create one or more container layers. Layers are an important concept. To explore this, we will go through another set of exercises.
First, check out the Javascript NodeJS app image you created earlier by using the docker history command (remember to use the docker image ls command from earlier exercises to find your image IDs):
docker history hello:v0.1What you see is the list of intermediate container images that were built along the way to creating your final Node.js app image. Some of these intermediate images will become layers in your final container image. In the history command output, the original Alpine layers are at the bottom of the list and then each customization we added in our Dockerfile is its own step in the output. This is a powerful concept because it means that if we need to make a change to our application, it may only affect a single layer! To see this, we will modify our app a bit and create a new image.
Go back to the files you used in that exercise and add an extra line to the index.js:
var os = require("os");
var hostname = os.hostname();
console.log("hello from " + hostname);
console.log("this is v0.2");
This will add a new line to the bottom of your index.js file from earlier so your application will output one additional line of text. Now we will build a new image using our updated code. We will also tag our new image to mark it as a new version so that anybody consuming our images later can identify the correct version to use:
docker build -t hello:v0.2 .You should see output similar to this:
Sending build context to Docker daemon  86.15MB
Step 1/5 : FROM alpine
 ---> 7328f6f8b418
Step 2/5 : RUN apk update && apk add nodejs
 ---> Using cache
 ---> 2707762fca63
Step 3/5 : COPY . /app
 ---> 07b2e2127db4
Removing intermediate container 84eb9c31320d
Step 4/5 : WORKDIR /app
 ---> 6630eb76312c
Removing intermediate container ee6c9e7a5337
Step 5/5 : CMD node index.js
 ---> Running in e079fb6000a3
 ---> e536b9dadd2f
Removing intermediate container e079fb6000a3
Successfully built e536b9dadd2f
Successfully tagged hello:v0.2
Notice something interesting in the build steps this time. In the output it goes through the same five steps, but notice that in some steps it says Using cache.

Docker recognized that we had already built some of these layers in our earlier image builds and since nothing had changed in those layers it could simply use a cached version of the layer, rather than pulling down code a second time and running those steps.
Docker’s layer management is very useful to IT teams when patching systems, updating or upgrading to the latest version of code, or making configuration changes to applications. Docker is intelligent enough to build the container in the most efficient way possible, as opposed to repeatedly building an image from the ground up each and every time.
Now let us reverse our thinking a bit. What if we get a container from Docker Hub or another registry and want to know a bit about what is inside the container we are consuming? Docker has an docker inspect command for images and it returns details on the container image, the commands it runs, the OS and more.
The alpine image should already be present locally from the exercises above (use docker image ls to confirm), if it’s not, run the following command to pull it down:
docker image pull alpineOnce we are sure it is there let’s inspect it.
docker image inspect alpineThere is a lot of information in there:
- the layers the image is composed of
- the driver used to store the layers
- the architecture / OS it has been created for
- metadata of the image
- …
We will not go into all the details here but we can use some filters to just inspect particular details about the image. You may have noticed that the image information is in JSON format. We can take advantage of that to use the inspect command with some filtering info to just get specific data from the image.
Let’s get the list of layers:
docker image inspect --format "{{ json .RootFS.Layers }}" alpineAlpine is just a small base OS image so there’s just one layer:
["sha256:60ab55d3379d47c1ba6b6225d59d10e1f52096ee9d5c816e42c635ccc57a5a2b"]Now let’s look at our custom Hello image. You will need the image ID (use docker image ls if you need to look it up):
docker image inspect --format "{{ json .RootFS.Layers }}" hello:v0.2Our image is a bit more interesting (your sha256 hashes will vary):
["sha256:5bef08742407efd622d243692b79ba0055383bbce12900324f75e56f589aedb0","sha256:5ac283aaea742f843c869d28bbeaf5000c08685b5f7ba01431094a207b8a1df9","sha256:2ecb254be0603a2c76880be45a5c2b028f6208714aec770d49c9eff4cbc3cf25"]We have three layers in our application. Recall that we had the base Alpine image (the FROM command in our Dockerfile), then we had a RUN command to install some packages, then we had a COPY command to add in our javascript code. Those are our layers!
If you look closely, you can even see that both alpine and hello are using the same base layer, which we know because they have the same sha256 hash.
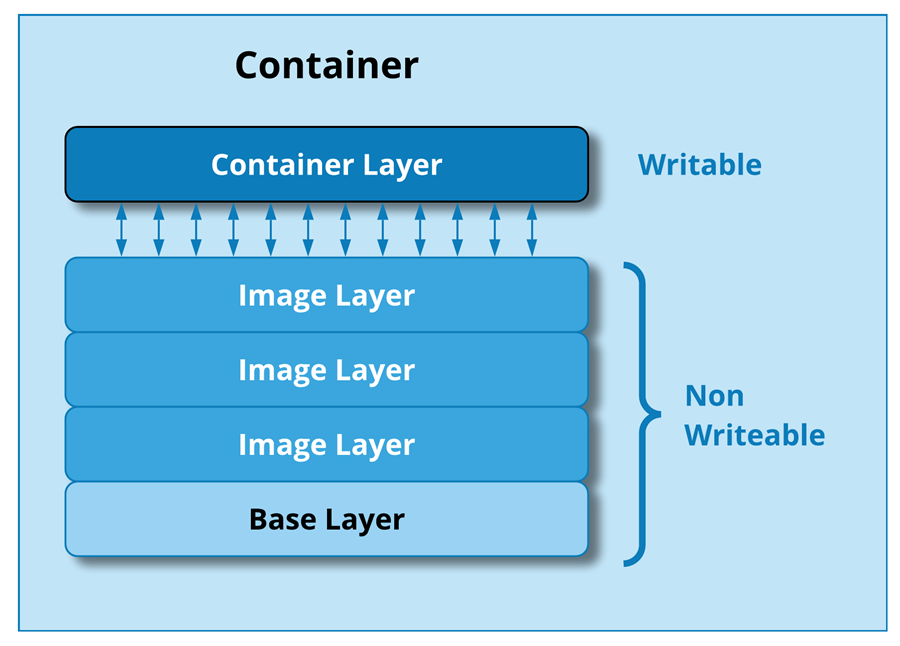
Another important note about layers: each layer is immutable (non-writable). As an image is created and successive layers are added, the new layers keep track of the changes from the layer below. When you start the container running there is an additional layer used to keep track of any changes that occur as the application runs (like the “hello.txt” file we created in the earlier exercises).
This design principle is important for both security and data management. If someone mistakenly or maliciously changes something in a running container, you can very easily revert back to its original state because the base layers cannot be changed.