
DevOps tools in the CI/CD pipeline
Now it is time to zoom in on the backbone of the DevOps lifecycle, the pipeline or workflow.
In this section we will be using GitHub Actions to make a larger pipeline/workflow. On top of delving deeper into the tools we will also fill in a number of steps in the DevOps lifecycle:
- Plan
- Code
- Test
- Release
- Deploy
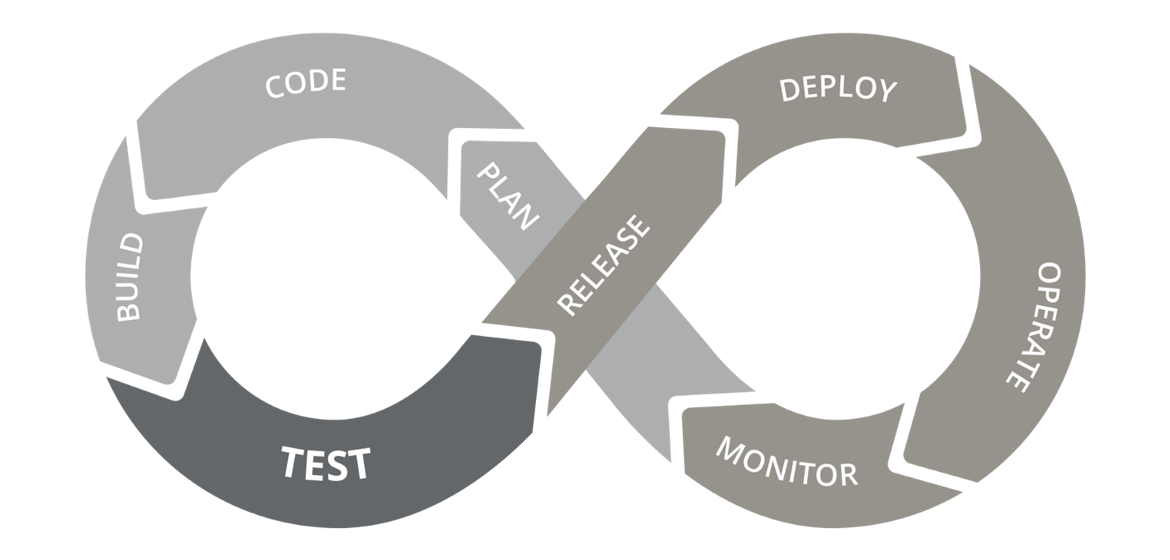
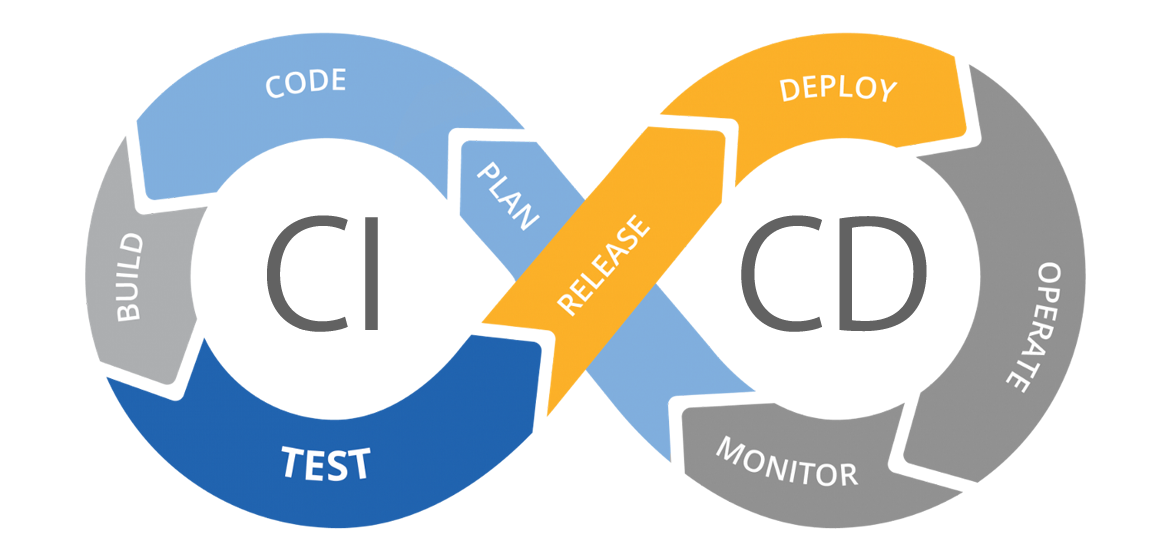
We will base ourselves on the same ♾ graphic:
♻ A workflow for a static website
As a learning example we will set up a DevOps pipeline/workflow with GitHub Actions for the website we used a while back. By doing this we will fill out the DevOps lifecycle and learn more about each step.
⚙ Setting it up
Start with creating a Public GitHub repository called website-test with the following contents:
📂website-test
├── 📄README.md
├── 📄index.html
├── 🎴logoimage.png
├── 📄style.css
├── 📄Dockerfile
└── 📂.github
    └── 📂workflows
        └── 📄workflow.yml
The README.md you can fill out yourself. The workflow.yml we will fill out throughout this page. The rest of the files can be viewed below:
📄 Example contents for the listed files
Contents of index.html:
<!-- index.html -->
<html>
    <head>
        <link rel="stylesheet" href="style.css">
    </head>
    <body>
        <div class="inner">
            <center>
            <h1>Welcome!</h1>
            <img src="./logoimage.png">
                <p>
                You've successfully deployed the containerized website!
                <p>
           </center>
        </div>
    </body>
</html>
Contents of style.css:
/* style.css */
body {
    background-image: linear-gradient(-74deg, transparent 90%, rgba(255, 255, 255, 0.23) 20%),
                      linear-gradient(-74deg, transparent 83%, rgba(255, 255, 255, 0.18) 15%),
                      linear-gradient(-74deg, transparent 76%, rgba(255, 255, 255, 0.1) 15%),
                      linear-gradient(to top, #127ab1, #1799e0, #1796db);
    background-size: cover;
    margin-bottom: 0px!important;
}
div{
    font-family: 'Geomanist', sans-serif;
    font-weight: normal;
    color: white;
    width: 50%;
    margin: 0 auto;
    position: relative;
    top: 30%;
    transform: translateY(-50%);
}
Contents of Dockerfile:
FROM nginx:latest
COPY index.html /usr/share/nginx/html
COPY logoimage.png /usr/share/nginx/html
COPY style.css /usr/share/nginx/html
EXPOSE 80 443
CMD ["nginx", "-g", "daemon off;"]
The first step of filling out the workflow.yml file is the following:
name: Pipeline

on:
  push:
    branches: [ main ]

jobs:
  test:
    runs-on: ubuntu-latest
    steps:
      - name: Checkout repository code into runner
        uses: actions/checkout@v2
      - name: Check HTML and CSS with HTML5 Validator
        uses: Cyb3r-Jak3/html5validator-action@v7.2.0
        with:
          root: ./
css: truePush the current contents to your repository.
A lot of the parts here you already recognize. There are however some new parts to analyze as well.
ℹ Analyzing what happened
For starters there is one new part at the top of the workflow:
branches: This indicates the branches that the workflow will run on. You can specify one or more branch names, patterns, or wildcards. For example, combined withpushthebranches: [ main ]means the workflow will run only on pushes to the main branch.
Besides that, this workflow also uses two built-in actions. These are pieces of pre-built functionality that are already available in GitHub Actions Marketplace and can be used directly in your workflow without needing to install or import it from a repository.
For example, actions/checkout is a built-in action that allows you to checkout (place) your repository code into the runner virtual machine.
In a workflow file these built-in actions are be reflected by:
uses: The action that the step will use. You can specify a built-in action, such as actions/checkout, actions/setup-node, etc., or a custom action from a repository, such asCyb3r-Jak3/html5validator-action.with: The input parameters that the action will use. You can specify one or more key-value pairs, depending on the action's specification.
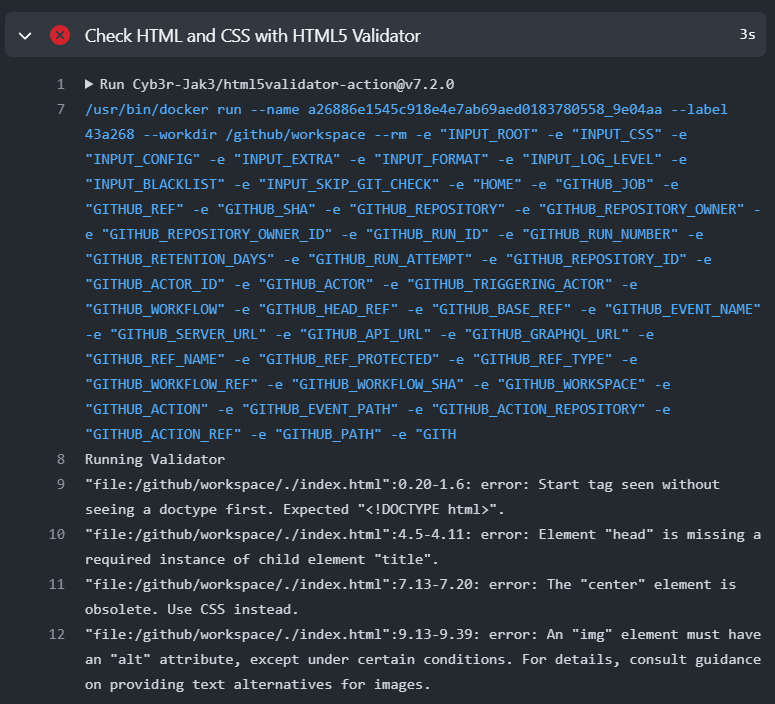
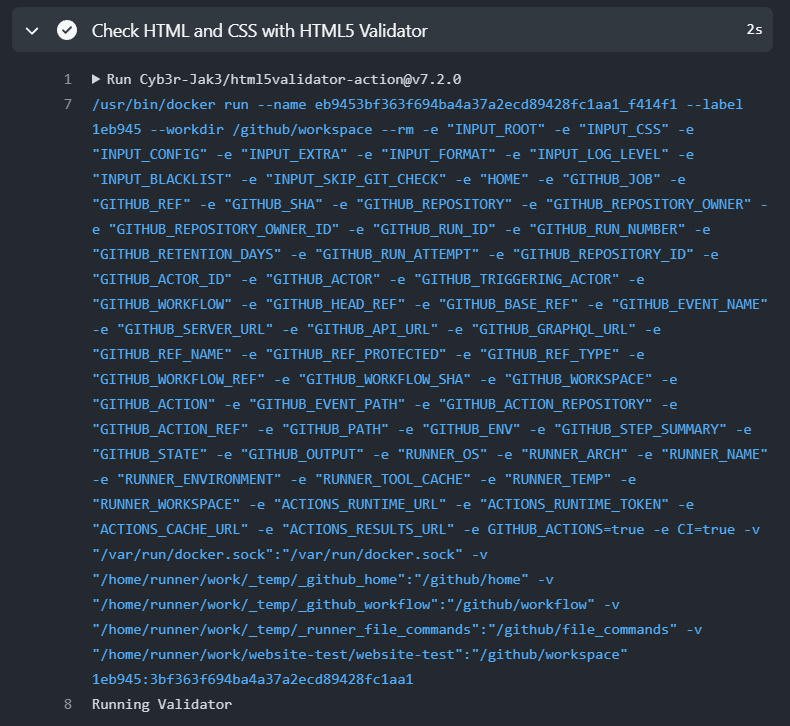
In this workflow the action Cyb3r-Jak3/html5validator-action checks and validates HTML and CSS files using HTML5 Validator. The input parameter css: true means that the step will also check and validate the css file. This can happen because the previous actions/checkout already placed the code of the repository inside the runner virtual machine. From then on this action can validate files.
As you can see our index.html still has some flaws. The step failed because the test validation didn't pass:
Fix the remarks by editing the index.html and style.css as such:
<!DOCTYPE html>
<!-- index.html -->
<html>
    <head>
        <title>Testpage</title>
        <link rel="stylesheet" href="style.css">
    </head>
    <body>
        <div class="inner">
            <h1>Welcome!</h1>
            <img alt="logo" src="./logoimage.png">
                <p>
                You've successfully deployed the containerized website!
                <p>
        </div>
    </body>
</html>/* style.css */
body {
background-image: linear-gradient(-74deg, transparent 90%, rgba(255, 255, 255, 0.23) 20%),
linear-gradient(-74deg, transparent 83%, rgba(255, 255, 255, 0.18) 15%),
linear-gradient(-74deg, transparent 76%, rgba(255, 255, 255, 0.1) 15%),
linear-gradient(to top, #127ab1, #1799e0, #1796db);
background-size: cover;
margin-bottom: 0px!important;
}
div{
font-family: 'Geomanist', sans-serif;
font-weight: normal;
color: white;
width: 50%;
margin: 0 auto;
position: absolute;
left: 50%;
top: 50%;
transform: translate(-50%, -50%);
}When we fix the flaws and push our changes, the validator approves of our index.html and the step does not fail anymore:
Both the actions/checkout@v2 and the Cyb3r-Jak3/html5validator-action actions can be viewed on the GitHub Action Marketplace. The first action is an Official Action and the second one is a third-party action made by users.
💡 The theory: A Continuous Integration (CI) pipeline
As you can see the goal of this worksflow is to test the code in the repository automatically every time a push happens. The way this continuously happens every time developers push and integrate their code into the repository has lead to the creation of the term Continuous Integration.
Continuous Integration or CI is named so because it emphasizes the continuous aspect of integrating code changes. Instead of waiting for a big merge of code at the end of a project or feature, CI promotes frequent integration of the changes done by developers into the existing code. This helps in catching issues early and maintaining a stable codebase as with every integration the included tests also run.
So, "continuous" refers to the ongoing automatic nature of integration, happening regularly, while "integration" highlights the process of combining code changes into a shared codebase. Each integration is verified by tests to detect errors as quickly as possible.
In our workflow example, CI is demonstrated through the automation of checking HTML and CSS files for errors. Instead of developers manually checking HTML and CSS files for errors, this process is integrated into the development workflow and executed automatically on every push. This ensures that any errors are detected and addressed quickly.
The ♾ graphic
A common way to represent the pipeline or workflow is to use the same infinity image that represents the DevOps lifecycle, which is a visual metaphor that shows the end-to-end process of building, testing, and deploying software. The steps we filled in up until now are:
- Plan: This step involves defining the software requirements, designing the software solution, and choosing the tools and technologies to be used. Here you often start working with Trello or Jira. This happens outside of our repository and workflow pipeline file but is still part of the DevOps lifecycle.
- Code: This step involves writing, editing, and organizing the code using version control systems and code editors. Developers also push their code changes to a remote repository (like GitHub), where the code is continuously integrated with the main codebase. This enables them to work together, integrate their code changes frequently, and automate the testing process.
- Test: This step involves verifying and validating the functionality, performance, and security of the code using various testing methods and tools. This happens automatically in a CI pipeline or workflow.
In an image this now looks like:
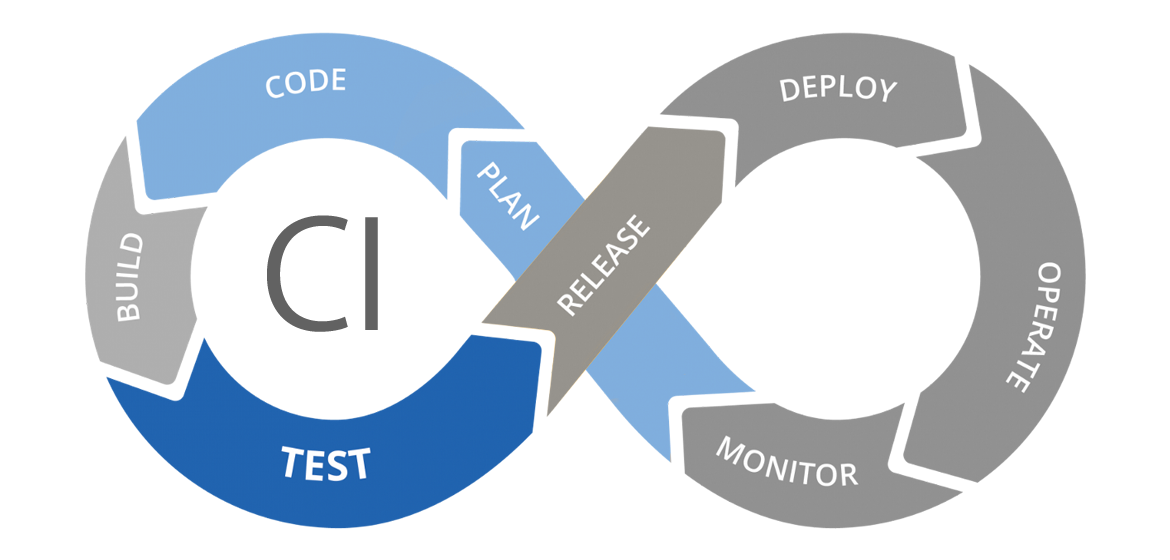
As you can see our basic CI pipeline has not yet covered the steps in gray. This does not mean that our current workflow or pipeline is unusable. Projects usually create the pipeline they need, which can just be a CI pipeline like this.
📦 Putting in containerization
Next up we will integrate our knowlegde about Dockerfiles into the process so that we can build a container image in the cloud via GitHub Actions instead of locally.
⚙ Setting it up
First off we need to securely store our Docker password and username in our GitHub repository so that GitHub Actions can use them in the same way we used them with our docker commands locally. We will use GitHub Secrets for this.
GitHub Secrets allows you to store sensitive information securely and use it in your workflows without exposing it in the code. To set up these secrets:
- Navigate to your repository on GitHub.
- Go to the "Settings" tab.
- In the left sidebar, click on "Secrets and variables" and "Actions".
- Click on "New repository secret".
- Add a secret with the name
DOCKERHUB_USERNAMEand the value being your Docker Hub username. - Similarly, add another secret with the name
DOCKERHUB_PASSWORDand the value being your Docker Hub password.
By referencing secrets.DOCKERHUB_USERNAME and secrets.DOCKERHUB_PASSWORD in the workflow file, GitHub Actions will automatically inject the corresponding secret values during execution, ensuring that sensitive information remains secure and isn't exposed in the workflow file itself.
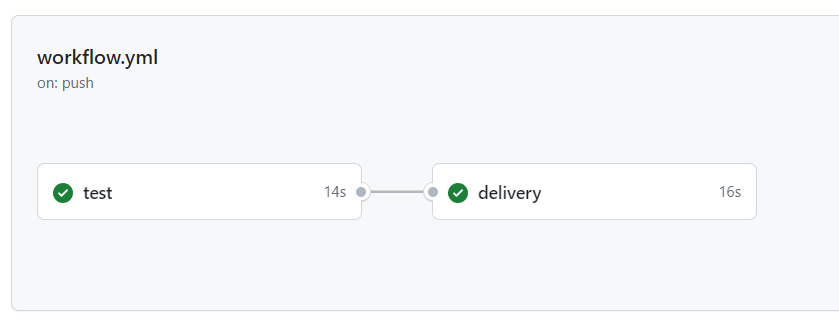
Edit and expand the workflow.yml with a second job delivery.
name: Pipeline
on:
push:
branches: [ main ]
jobs:
test:
runs-on: ubuntu-latest
steps:
- name: Checkout repository code into runner
uses: actions/checkout@v2
- name: Check HTML and CSS with HTML5 Validator
uses: Cyb3r-Jak3/html5validator-action@v7.2.0
with:
root: ./
css: true
ℹ Analyzing what happened
This extra job delivery is an entirely new job, so will run in a new, seperate, runner virtual machine than the test job. This new job will closely resemble what we did earlier to build Docker container images locally.
The following new workflow parts are of interest:
needs: This line specifies a dependency between this job (delivery) and another job namedtest. Thedeliveryjob will only start after thetestjob has completed successfully. This ensures that any necessary tests or validations are performed before proceeding.uses: docker/login-action@v1: This line indicates the usage of a Docker Login Action. This action automates the process of logging in to Docker Hub within the workflow. It's fetched from the GitHub Actions Marketplace (docker/login-action), specifically version 1 (@v1).with: This section provides input parameters for the Docker Login Action. In this case, it specifies the Docker Hub username and password. However, it's important to note that storing sensitive information like passwords directly in the workflow file is not recommended due to security risks. That why we use GitHub Secrets here.
💡 The theory: A Continuous Integration / Continuous Delivery (CI/CD) pipeline
As you can see, the next step of this workflow is to prepare the software for deployment. The way this is done continuously and automatically every time the software passes the previous tests has given rise to the term Continuous Delivery.
Continuous Delivery or CD is named so because it emphasizes the continuous aspect of delivering software. Instead of waiting for a big release at the end, CD enables frequent delivery of the software to the customer or the team. This helps in reducing the cost, time, and risk of delivering changes and maintaining a high-quality product as with every delivery the software is verified by tests and feedback.
So, "continuous" refers to the ongoing automatic nature of delivery, happening regularly, while "delivery" highlights the process of making software available for use in a standardized and consistent way. Each delivery is of course still verified by tests.
In our workflow example, CD is demonstrated through the automation of packaging the application and its dependencies into containers. Instead of manually preparing the software for deployment, this process is integrated into the development workflow and executed automatically on every code push. This ensures that the website is always in a release-ready state, allowing teams or the customer to use it at any time.
The ♾ graphic
This is added to the infinity image as a release step:
- Release: In this step, the software is prepared for deployment and released as a package, executable or container.
In an image this looks like:
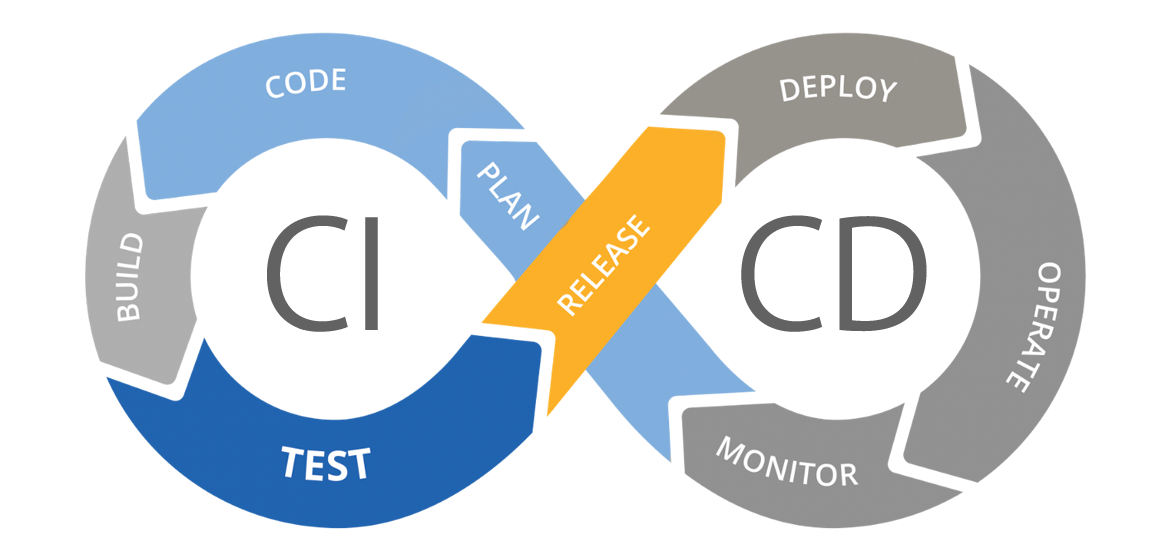
Again, as you can see our basic CI/CD pipeline has not yet covered the steps in gray. This does not mean that our current workflow or pipeline is unusable. Projects usually create the pipeline they need, which can just be a CI/CD pipeline like this.
🚀 Automating deployment
Lastly we can expand even more and automatically (re-)deploy the website every time new code gets pushed and integrated.
In this case we will use Github Pages to deploy our website code to and integrate it using this Action with GitHub Actions. It will create a new branch for Github Pages so the workflow needs write access as well.
⚙ Setting it up
Edit and expand the workflow.yml. Also check out the edited permissions at the top of the workflow files.
name: Pipeline
on:
push:
branches: [ main ]
permissions:
contents: write
jobs:
test:
runs-on: ubuntu-latest
steps:
- name: Checkout repository code into runner
uses: actions/checkout@v2
- name: Check HTML and CSS with HTML5 Validator
uses: Cyb3r-Jak3/html5validator-action@v7.2.0
with:
root: ./
css: true
delivery:
runs-on: ubuntu-latest
needs: test
steps:
- name: Checkout repository code into runner
uses: actions/checkout@v2
- name: Build the Docker image
run: docker build -t ${{ secrets.DOCKERHUB_USERNAME }}/test-website:latest .
- name: Log in to Docker Hub
uses: docker/login-action@v1
with:
username: ${{ secrets.DOCKERHUB_USERNAME }}
password: ${{ secrets.DOCKERHUB_PASSWORD }}
- name: Push the image to Docker Hub
run: docker push ${{ secrets.DOCKERHUB_USERNAME }}/test-website:latest
Push the new changes. The workflow will run.
After that you need to tell Github to take the new gh-pagesbranch, and deploy that as the Github Pages of this repository. To set this up:
- Navigate to your repository on GitHub.
- Go to the "Settings" tab.
- In the left sidebar, click on "Pages".
- At Branch, select
gh-pagesas branch to deploy and click Save. - Wait one or two minutes
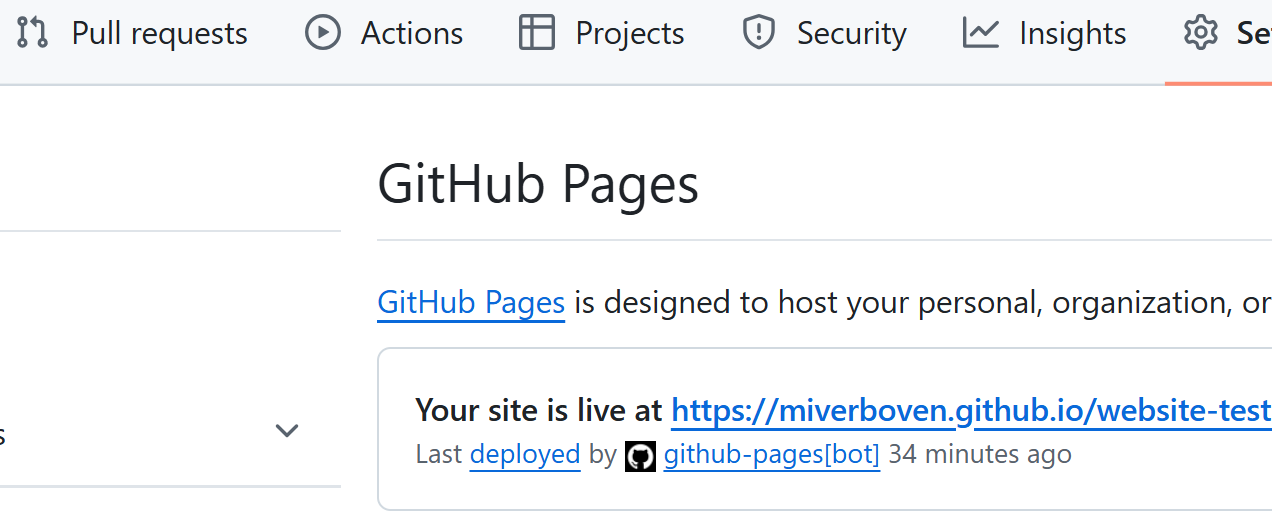
- The Your site is live at ... appears at the top of the page after a refresh of the page.
Now you can click the link that appeared to view your site.
ℹ Analyzing what happened

As you can see we created another job called deploy which will deploy our files to GitHub Pages. Because we also added needs: test to this deploy job it will run paralell with the deliver job. The live site will be automatically updated after a push, though you need to wait about 1,5 minutes after each push.
In this job, the following new workflow parts are of interest:
uses: peaceiris/actions-gh-pages@v4: This line indicates the usage of an GitHub Pages Action. This action deploys the static web to a new branch calledgh-pages. It's fetched from the GitHub Actions Marketplace (peaceiris/actions-gh-pages), specifically version 4 (@v4).with: This section provides input parameters for the Azure Static Web Apps Deploy Action. In this case, it specifies the following:github_token: This is the GitHub token for the repository. It's used for GitHub integrations, such as posting comments on pull requests. It's also stored as a GitHub Secret automatically by GitHub, even if it does not show in the list of your own secrets.publish_dir:: This is the app source code path. It specifies the location of the app files within the repository. In this case, it's set to the value of the root of the repository being.
💡 The theory: A Continuous Integration / Continuous Deployment (CI/CD) pipeline
As you can see, the next step of this workflow is to deploy the software to the production environment automatically every time the software passes the tests. The way this continuously happens every time the software is ready for use has given rise to the term Continuous Deployment.
Continuous Deployment or CD is named so because it emphasizes the continuous aspect of deploying software. Instead of waiting for a manual approval at the end, CD enables automatic deployment of the software to the users.
So, "continuous" refers to the ongoing automatic nature of deployment, happening regularly, while "deployment" highlights the process of releasing software into the production environment. Each deployment is still verified by tests to ensure customer satisfaction and value, and optionally also released seperatelsy.
In our workflow example, CD is demonstrated through the automation of deploying the software into the production environment. Instead of manually approving the software for deployment, this process is integrated into the development workflow and executed automatically on every code push. This ensures that the website is always available for use by the users.
The ♾ graphic
This is added to the infinity image as a deploy step:
- Deploy: In this step, the software is delivered to the production environment and made available for use by the users.
In an image this looks like:
Again still, as you can see our basic CI/CD pipeline has not yet covered the steps in gray. This does not mean that our current workflow or pipeline is unusable. Projects usually create the pipeline they need, which can just be a CI/CD pipeline like this.
This already covers quite a part of the DevOps lifecycle and the related pipeline/workflow. Later on we will also fill in the other steps.