
Working with Java to bring the Build step into the DevOps lifecycle
Now that we know more about Building code and the Build process, it is time to apply this to a programming language used in other courses: Java projects.
- We will first look at what happens when you build, test and run your Java project on your local machine while using an IDE like IntelliJ. It is important to know what happens behind the scenes to eventually do these steps using command line.
- After that we will use that knowledge about building, testing and running your Java projects using the commandline to build a DevOps CI/CD pipeline and do these steps in the Cloud. Do so we will complete our DevOps lifecycle a bit more to include the Build step as well.
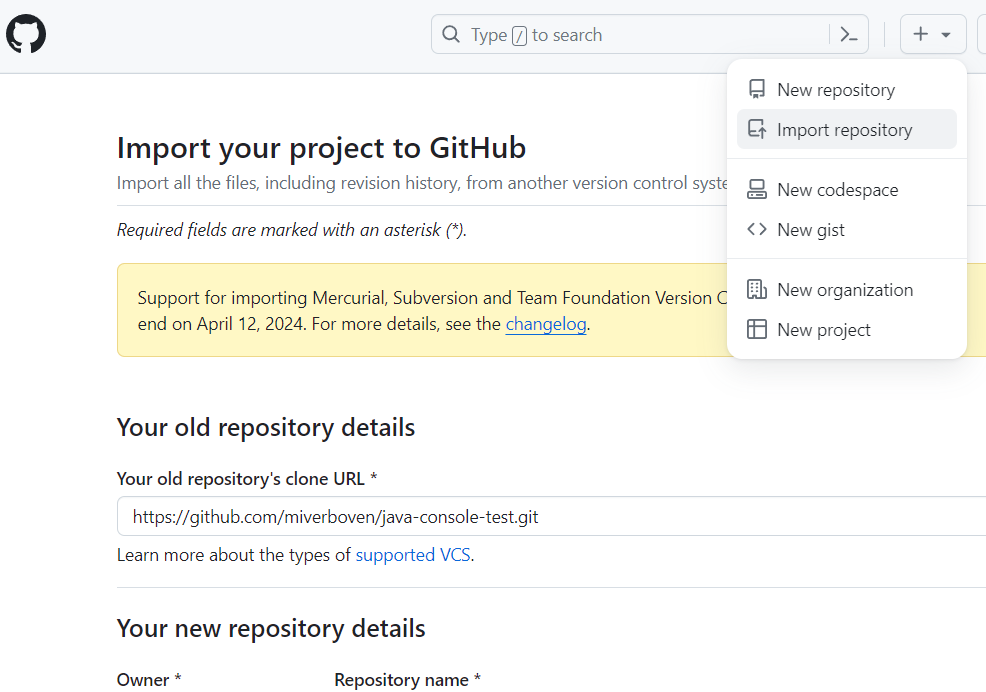
First of all we need an example to work with. Go and Import a repository on your GitHub. The repository you should be importing is https://github.com/miverboven/java-console-test.git. Call this repository java-console-test in your repository as well:
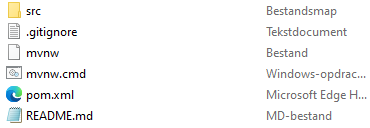
Open your new repository on GitHub and clone it into a folder on your machine so that you get this:
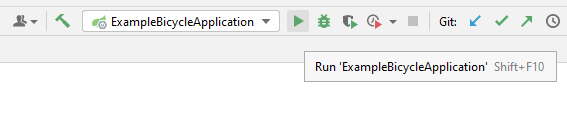
Looking behind the Run button in IntelliJ
Have you ever wondered what happens behind the scenes when you click the Run or Build button in IntelliJ? We will take a deep dive into the inner workings of IntelliJ and Maven, the build automation tool often integrated with it. Instead of relying on the button-click convenience, we'll explore these processes manually through command-line execution.
Maven
![]() Maven is a powerful build automation tool primarily used for Java projects. It helps manage libraries, build processes, and project documentation. When you click the Run button in IntelliJ, especially for Maven projects, several steps are executed by Maven behind the scenes to ensure your code runs smoothly.
Maven is a powerful build automation tool primarily used for Java projects. It helps manage libraries, build processes, and project documentation. When you click the Run button in IntelliJ, especially for Maven projects, several steps are executed by Maven behind the scenes to ensure your code runs smoothly.
🔨 Building your code
As such we will look what goes on behind this button:

When you click Run in IntelliJ, if your project is configured to use Maven, IntelliJ first checks your project's pom.xml file. This file contains project information and configuration, including libraries, plugins, and build settings.
Below is the pom.xml file of our example project:
<?xml version="1.0" encoding="UTF-8"?>
<project xmlns="http://maven.apache.org/POM/4.0.0" xmlns:xsi="http://www.w3.org/2001/XMLSchema-instance"
         xsi:schemaLocation="http://maven.apache.org/POM/4.0.0 https://maven.apache.org/xsd/maven-4.0.0.xsd">
    <modelVersion>4.0.0</modelVersion>
    <parent>
        <groupId>org.springframework.boot</groupId>
        <artifactId>spring-boot-starter-parent</artifactId>
        <version>2.4.1</version>
        <relativePath/> <!-- lookup parent from repository -->
    </parent>
    <groupId>fact.it</groupId>
    <artifactId>example-bicycle</artifactId>
    <version>0.0.1-SNAPSHOT</version>
    <name>example-bicycle</name>
    <description>Demo project for Spring Boot</description>

    <properties>
        <java.version>11</java.version>
    </properties>

    <dependencies>
        <dependency>
            <groupId>org.springframework.boot</groupId>
            <artifactId>spring-boot-starter-web</artifactId>
        </dependency>

        <dependency>
            <groupId>org.springframework.boot</groupId>
            <artifactId>spring-boot-starter-test</artifactId>
            <scope>test</scope>
        </dependency>
    </dependencies>

    <build>
        <plugins>
            <plugin>
                <groupId>org.springframework.boot</groupId>
                <artifactId>spring-boot-maven-plugin</artifactId>
            </plugin>
        </plugins>
    </build>

</project>
Understanding the basic structure of a pom.xml file:
<project>: The root element of the POM (Project Object Model) file.<modelVersion>: Specifies the version of the POM schema being used (usually4.0.0).<groupId>: Specifies a unique identifier for your project's group or organization. It's typically based on a reversed domain name, likecom.example.<artifactId>: Specifies the name of the project or artifact. This is the name you give to your project.<version>: Specifies the version of the project. It's typically in the formatmajor.minor.patch, such as1.0.0.<java.version>: Specifies the version of Java required for the project.<dependencies>: Specifies external libraries or dependencies required for your project to compile and run.<build>: Contains configuration for the build process.<plugins>: Specifies additional build plugins or extensions used during the build process.
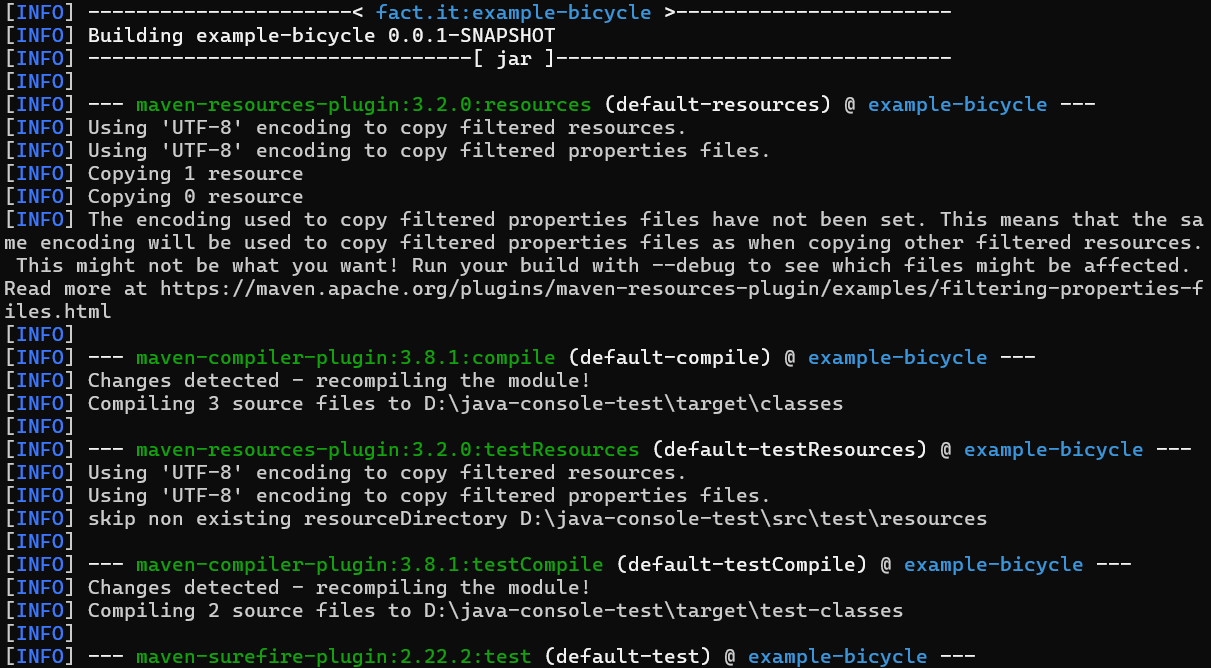
Maven uses this information to manage libraries and execute build processes. One of the fundamental tasks performed by Maven during the build process is compilation. Maven compiles your Java source code files (*.java) into bytecode (*.class files), which can be executed by the Java Virtual Machine (JVM). The compilation process ensures that your code is syntactically correct and ready to be executed.
Usually these resulting .class files are placed in the /target/classes folder of the project.
Corresponding Maven Command to build your code:
Try to run this command when you have your command line open in the folder where the pom.xml is located:
mvn compile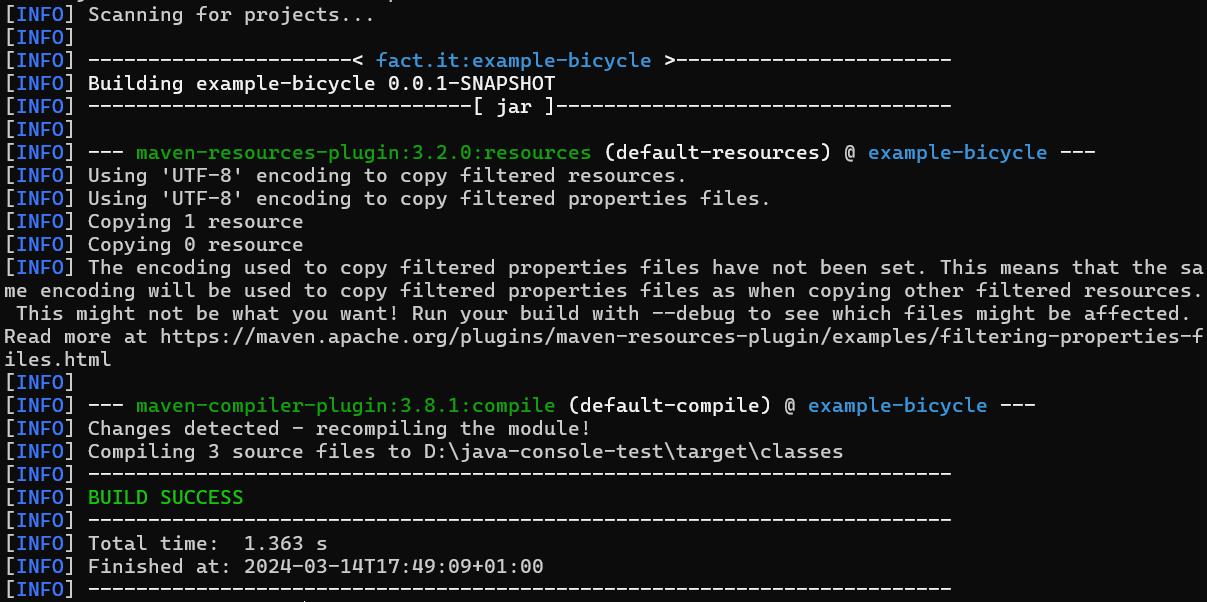
mvn compile command. Notice there is now a /classes folder for the .class filesThese resulting .class files are placed in the /target/classes folder of the project.
WARNING
Usually when you are working with IntelliJ you already have Java and Maven installed. If not, visit the installation page of Maven and install from the binary zip.
🧪 Testing your code
Testing is a crucial aspect of software development to ensure code quality and reliability. In your Java courses you use tests to check if you programmed your code correctly, much like real developers do.
As such we will look what goes on behind this button:
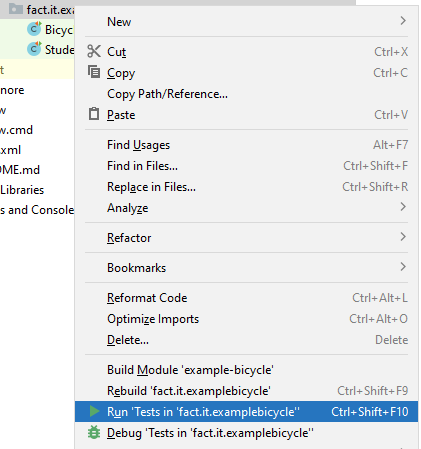
Maven facilitates this testing by running unit tests that developers coded. Unit tests are a type of test that focus on testing individual units or components of your code in isolation, like a single method. For example, consider the following unit test in the example application:
import org.junit.Test;
import static org.junit.Assert.assertEquals;

public class StudentTest {

    @Test
    public void testGetEmailAddress() {
        Student student = new Student("r123456", "Jan", "Janssen");
        assertEquals("r123456@student.thomasmore.be", student.getEmailAddress());
    }
}
In this example, the testGetEmailAddress method tests the getEmailAddress method of the Student class. It creates a Student object with a specific student ID, first name, and last name. Then, it asserts that the email address generated by the getEmailAddress method matches the expected email address format.
By writing and running unit tests like this, developers can verify that individual components of their code behave as expected.
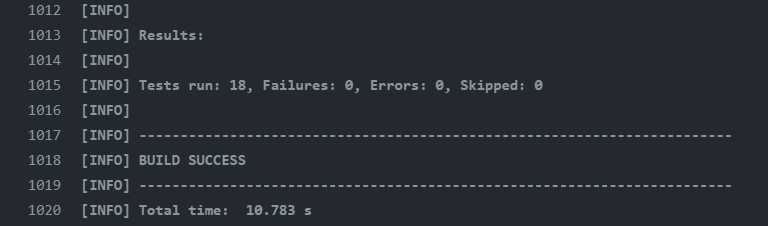
If you command Maven to run the tests in a project, Maven will first build the code and then run the tests. If any test fails, Maven alerts the developer, indicating potential issues in the code that need attention.
Corresponding Maven Command to run the tests in a project:
Try to run this command when you have your command line open in the folder where the pom.xml is located:
mvn test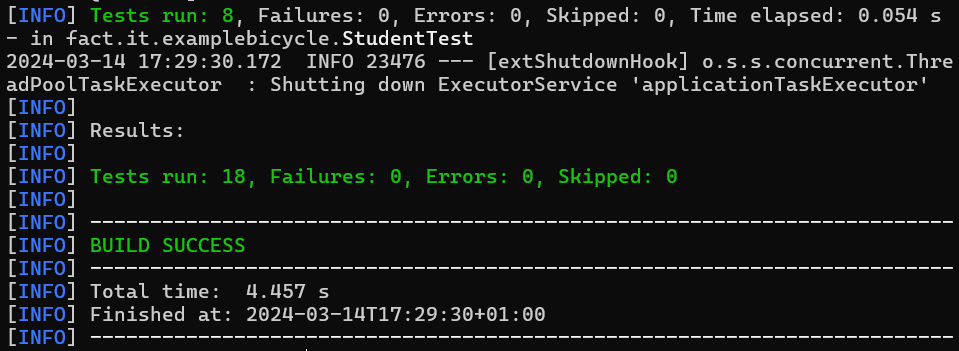
If you scroll up you can find proof of Maven first building the code again:
▶ Running your code
Running your code in Java means that you are running the result of a compilation. In case of Java this can be a .class file or a .jar file.
We will look what goes on behind this button:
📄 As a .class file(s)
When you click Run in IntelliJ, if your Maven project is configured appropriately, Maven builds your project, tests it, and then runs the .class file(s). It does this using the java command in command line.
In the Run window this looks like this:

When we look for the java command in the output we can find it on the first line. Notice that instead of just using java as a command IntelliJ actually goes to the java.exe that's making the command work and uses that directly:
C:\John\.jdks\openjdk-18.0.1.1\bin\java.exe -XX:TieredStopAtLevel=1 -noverify -Dspring.output.ansi.enabled=always -Dcom.sun.management.jmxremote -Dspring.jmx.enabled=true -Dspring.liveBeansView.mbeanDomain -Dspring.application.admin.enabled=true "-javaagent:C:\Program Files\JetBrains\IntelliJ IDEA 2020.2.3\lib\idea_rt.jar=49252:C:\Program Files\JetBrains\IntelliJ IDEA 2020.2.3\bin" -Dfile.encoding=UTF-8 -classpath D:\java-console-test\target\classes;C:\Users\Verboven\.m2\repository\org\springframework\boot\spring-boot-starter-web\2.4.1\spring-boot-starter-web-2.4.1.jar;C:\Users\Verboven\.m2\repository\org\springframework\boot\spring-boot-starter\2.4.1\spring-boot-starter-2.4.1.jar;C:\Users\Verboven\.m2\repository\org\springframework\boot\spring-boot\2.4.1\spring-boot-2.4.1.jar;C:\Users\Verboven\.m2\repository\org\springframework\boot\spring-boot-autoconfigure\2.4.1\spring-boot-autoconfigure-2.4.1.jar;C:\Users\Verboven\.m2\repository\org\springframework\boot\spring-boot-starter-logging\2.4.1\spring-boot-starter-logging-2.4.1.jar;C:\Users\Verboven\.m2\repository\ch\qos\logback\logback-classic\1.2.3\logback-classic-1.2.3.jar;C:\Users\Verboven\.m2\repository\ch\qos\logback\logback-core\1.2.3\logback-core-1.2.3.jar;C:\Users\Verboven\.m2\repository\org\apache\logging\log4j\log4j-to-slf4j\2.13.3\log4j-to-slf4j-2.13.3.jar;C:\Users\Verboven\.m2\repository\org\apache\logging\log4j\log4j-api\2.13.3\log4j-api-2.13.3.jar;C:\Users\Verboven\.m2\repository\org\slf4j\jul-to-slf4j\1.7.30\jul-to-slf4j-1.7.30.jar;C:\Users\Verboven\.m2\repository\jakarta\annotation\jakarta.annotation-api\1.3.5\jakarta.annotation-api-1.3.5.jar;C:\Users\Verboven\.m2\repository\org\yaml\snakeyaml\1.27\snakeyaml-1.27.jar;C:\Users\Verboven\.m2\repository\org\springframework\boot\spring-boot-starter-json\2.4.1\spring-boot-starter-json-2.4.1.jar;C:\Users\Verboven\.m2\repository\com\fasterxml\jackson\core\jackson-databind\2.11.3\jackson-databind-2.11.3.jar;C:\Users\Verboven\.m2\repository\com\fasterxml\jackson\core\jackson-annotations\2.11.3\jackson-annotations-2.11.3.jar;C:\Users\Verboven\.m2\repository\com\fasterxml\jackson\core\jackson-core\2.11.3\jackson-core-2.11.3.jar;C:\Users\Verboven\.m2\repository\com\fasterxml\jackson\datatype\jackson-datatype-jdk8\2.11.3\jackson-datatype-jdk8-2.11.3.jar;C:\Users\Verboven\.m2\repository\com\fasterxml\jackson\datatype\jackson-datatype-jsr310\2.11.3\jackson-datatype-jsr310-2.11.3.jar;C:\Users\Verboven\.m2\repository\com\fasterxml\jackson\module\jackson-module-parameter-names\2.11.3\jackson-module-parameter-names-2.11.3.jar;C:\Users\Verboven\.m2\repository\org\springframework\boot\spring-boot-starter-tomcat\2.4.1\spring-boot-starter-tomcat-2.4.1.jar;C:\Users\Verboven\.m2\repository\org\apache\tomcat\embed\tomcat-embed-core\9.0.41\tomcat-embed-core-9.0.41.jar;C:\Users\Verboven\.m2\repository\org\glassfish\jakarta.el\3.0.3\jakarta.el-3.0.3.jar;C:\Users\Verboven\.m2\repository\org\apache\tomcat\embed\tomcat-embed-websocket\9.0.41\tomcat-embed-websocket-9.0.41.jar;C:\Users\Verboven\.m2\repository\org\springframework\spring-web\5.3.2\spring-web-5.3.2.jar;C:\Users\Verboven\.m2\repository\org\springframework\spring-beans\5.3.2\spring-beans-5.3.2.jar;C:\Users\Verboven\.m2\repository\org\springframework\spring-webmvc\5.3.2\spring-webmvc-5.3.2.jar;C:\Users\Verboven\.m2\repository\org\springframework\spring-aop\5.3.2\spring-aop-5.3.2.jar;C:\Users\Verboven\.m2\repository\org\springframework\spring-context\5.3.2\spring-context-5.3.2.jar;C:\Users\Verboven\.m2\repository\org\springframework\spring-expression\5.3.2\spring-expression-5.3.2.jar;C:\Users\Verboven\.m2\repository\org\slf4j\slf4j-api\1.7.30\slf4j-api-1.7.30.jar;C:\Users\Verboven\.m2\repository\org\springframework\spring-core\5.3.2\spring-core-5.3.2.jar;C:\Users\Verboven\.m2\repository\org\springframework\spring-jcl\5.3.2\spring-jcl-5.3.2.jar fact.it.examplebicycle.ExampleBicycleApplicationWhat you also notice is that this command is very long. This is because when we want to run .class files we also need to reference every single seperate library file we used. Because we are working with Spring Boot framework these are a lot of libraries.
Try running the java command without references to any libraries and see what happens:
- Navigate to the
\target\classesfolder of the project - Run
java fact.it.examplebicycle.ExampleBicycleApplication
An error will be the result, as you did not reference any of the libraries that are needed:

📦 As a .jar file
In addition to building to .class files, Maven can also package your application into stand-alone executable formats, such as .jar JAR (Java ARchive) files. You can also do this in IntelliJ by enabling the Build Artifact option, check out how to do that at this page.
Unlike individual .class files, which represent individual Java classes, .jar JAR files encapsulate an entire application or library, including multiple classes, resources, and metadata. They provide a convenient way to distribute and execute Java applications across different platforms. Similar to how we could create a stand-alone .exe file from C code in the previous example. This allows you to distribute your application easily to others without requiring them to have the entire source code or development environment installed.

.jar fileThe <artifactId> and <version> in the pom.xml file influence the name of the generated JAR file. By default, Maven uses the combination of <artifactId> and <version> to construct the name of the JAR file. For example, if your <artifactId> is example-bicycle and your <version> is 0.0.1-SNAPSHOT, the generated JAR file will be named example-bicycle-0.0.1-SNAPSHOT.jar.
Corresponding Maven Command to build a project to a .JAR file:
Try to run this command when you have your command line open in the folder where the pom.xml is located:
mvn package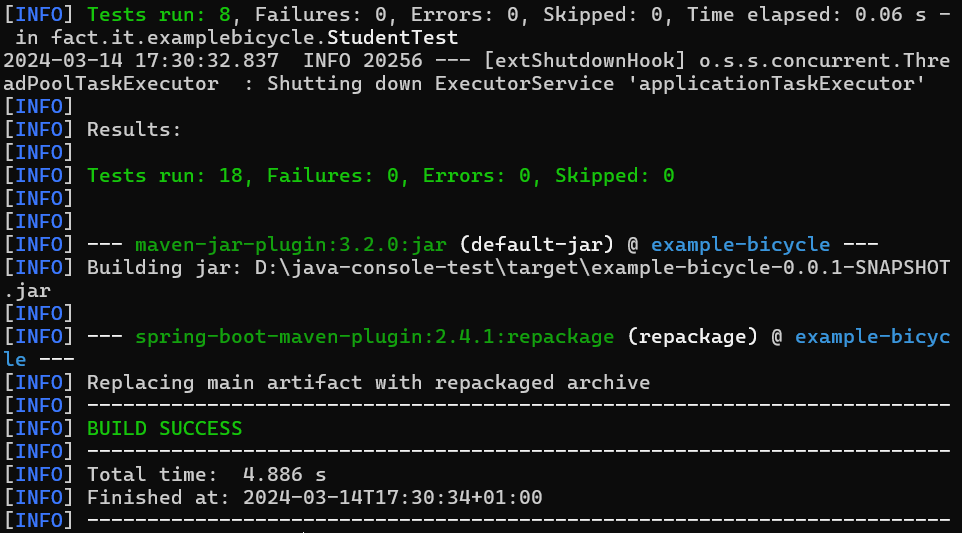
mvn package command. As you can see it also runs the tests before thisOnce the JAR file is generated in the /target folder of the project, you can run your code as a standalone application by executing the JAR file through the command line with the java -jar command or by double-clicking it, depending on your operating system's configuration.
Try to run this command when you have your command line open in the /target folder:
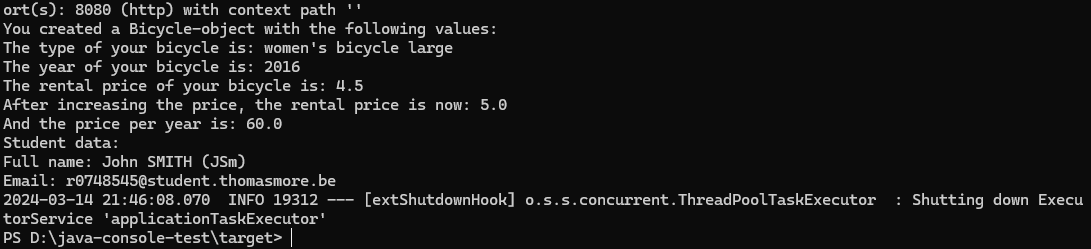
java -jar .\example-bicycle-0.0.1-SNAPSHOT.jarAs a result you can see your application running:
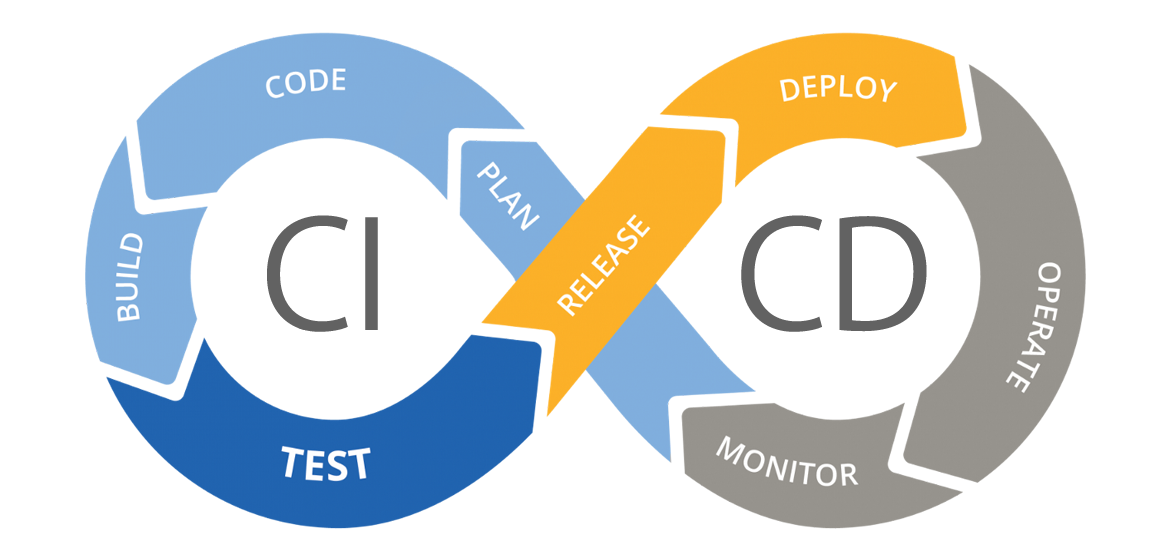
Moving it a CI/CD DevOps pipeline with a Build step
Now we will use the knowledge about building, testing and running your Java projects using the commandline to build a DevOps CI/CD pipeline and do these steps in the Cloud. To do so we will expand our DevOps lifecycle a bit more to include the Build step as well.
At the end of this you should have knowledge about the following colored steps of the DevOps lifecycle:
Java is a hybrid language and whenever you are working with compiled and hybrid languages you will need a Build step in your DevOps workflow. This table categorizes shows some of the most popular:
| Type | Languages |
|---|---|
| Interpreted | Python 🐍, Ruby 💎, JavaScript 📜, PHP 🐘 |
| Compiled | C 🛠️, C++ ➕, Go 🐹, Rust 🦀 |
| Hybrid | Java ☕, C# 🟣 |
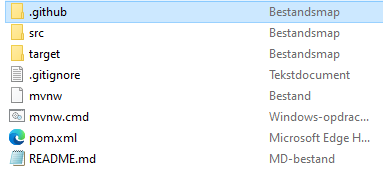
To start off with this Java example, create a GitHub actions workflow.yml file in the /.github/workflows folder of the project folder:
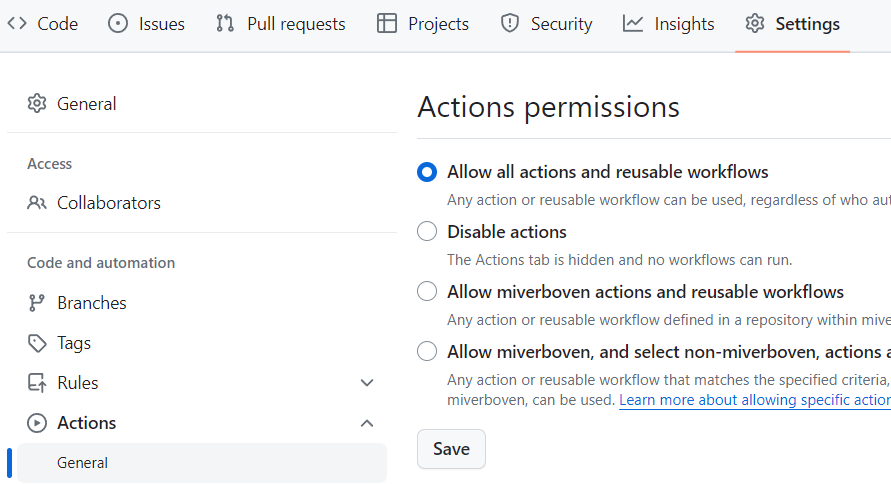
Imported repositories have GitHub Actions disabled by default. Enable them again in the Settings -> Actions -> General tab of the repository as well:
Build step and Test step together
Create this first version of the workflow.yml file and push it to your repository:
name: Pipeline

on:
  push:
    branches: [ main ]

jobs:
  build-and-test:
    runs-on: ubuntu-latest
    steps:
      - name: Checkout repository code into runner
        uses: actions/checkout@v2
      - name: Set up JDK 11
        uses: actions/setup-java@v2
        with:
          java-version: '11'
          distribution: 'adopt'
      - name: Test with Maven
        run: mvn test -B
The steps of this build-and-test job are the following:
name: Checkout repository code into runner- This step is responsible for fetching the codebase from the repository and making it available in the cloud runner virtual machine where the workflow is executed.
name: Set up JDK 11- This step installs and configures the Java Development Kit (JDK) version 11 environment on the runner.
withsection:java-version: '11'specifies the desired JDK Java version. We know which one to use by looking at thepom.xmlof the project.distribution: 'adopt'selects the AdoptOpenJDK distribution of JDK 11.
name: Test with Maven- This step runs the Maven command
mvn testto execute the test phase of the Maven lifecycle. - The
-Baftermvn testflag indicates that Maven should run in non-interactive (batch) mode, which is suitable for automation workflows. This reduces the amount of text being put into the console. Without this you will easily get 10.000 lines or more in your output.
- This step runs the Maven command
As you can see, the Build step and the Test step of the DevOps lifecycle are done in one job. This is possible because Maven builds the code before testing it, clearing both steps at once.
Delivery step with a container
With the tests implemented in our workflow pipeline, we ended up with a CI pipeline. Now we will add a Release step to create a CI/CD pipeline:

We will do this using a container. To make this happen create a Dockerfile in the folder of the project:
FROM openjdk:17-jdk-alpine
COPY target/*.jar app.jar
ENTRYPOINT ["java","-jar","/app.jar"]
This Dockerfile is used to build a Docker image for running a Java application:
FROM openjdk:17-jdk-alpine: This line specifies the base image for this Dockerfile. It indicates that the image will be based on Alpine Linux with OpenJDK version 17. Alpine Linux is a lightweight Linux distribution often used in Docker containers due to its small size.COPY target/*.jar app.jar: This line adds the JAR file(s) from thetargetdirectory of the Docker build context into the root directory of the Docker image and renames it toapp.jar. TheCOPYinstruction is used to copy files and directories from the build context (the directory containing the Dockerfile) into the Docker image.ENTRYPOINT ["java","-jar","/app.jar"]: This line specifies the command to be executed when a container is started from the image. It sets the entry point to execute the Java command to run the JAR fileapp.jar. So, when a container is started from this image, it will run the Java application contained inapp.jar.
Edit the workflow.yml as well to add the deliver-container job and push it and the Dockerfile to your repository:
name: Pipeline

on:
  push:
    branches: [ main ]

jobs:
  build-and-test:
    runs-on: ubuntu-latest
    steps:
      - name: Checkout repository code into runner
        uses: actions/checkout@v2
      - name: Set up JDK 11
        uses: actions/setup-java@v2
        with:
          java-version: '11'
          distribution: 'adopt'
      - name: Test with Maven
        run: mvn test -B

  deliver-container:
    runs-on: ubuntu-latest
    needs: build-and-test
    steps:
      - name: Checkout repository code into runner
        uses: actions/checkout@v2
      - name: Set up JDK 11
        uses: actions/setup-java@v2
        with:
          java-version: '11'
          distribution: 'adopt'
      - name: Build the JAR file with Maven
        run: mvn package -B
      - name: Build the Docker image
        run: docker build -t ${{ secrets.DOCKERHUB_USERNAME }}/java-console-test:latest .
      - name: Log in to Docker Hub
        uses: docker/login-action@v1
        with:
          username: ${{ secrets.DOCKERHUB_USERNAME }}
          password: ${{ secrets.DOCKERHUB_PASSWORD }}
      - name: Push the image to Docker Hub
        run: docker push ${{ secrets.DOCKERHUB_USERNAME }}/java-console-test:latest
Most of the steps here are not new knowledge, except:
name: Build the JAR file with Maven- This step executes the Maven command
mvn package -Bto build the JAR file for the project. - At that point the JAR file is present in the
targetfolder at the current directory where the runner virtual machine is completing the job.
- This step executes the Maven command
Once the workflow has completed successfully, go ahead and try pulling the image and running your new container:
docker run yourusername/java-console-test:latestDelivery step with the executable uploaded as an artifact
In GitHub Actions, "uploading artifacts" refers to the process of storing and making specific files from the runner virtual machine available for later use or download within a workflow run. Artifacts can include compiled binaries, build outputs, log files, test results, or any other files that are generated during the execution of a workflow.
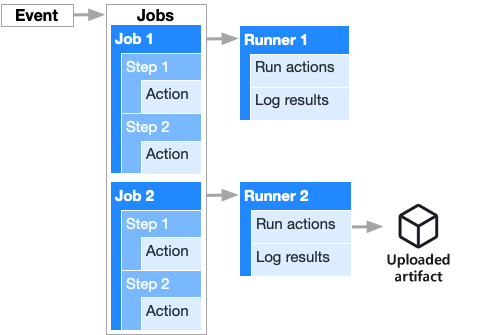
on: an event and that has two jobs. The steps of each of these jobs gets run in a runner virtual machine started up in the cloud by GitHub. One of the jobs is using an Upload Artifact actionHere's an overview of how uploading artifacts works in GitHub Actions:
- Generating Artifacts: Typically, artifacts are generated as part of the workflow execution. For example, in a build workflow for a software project, artifacts may include compiled binaries, such as JAR files, or other build outputs.
- Uploading Artifacts: Once the artifacts are generated, they can be uploaded to the GitHub webpage of your project using the
actions/upload-artifactaction. This action allows you to specify the name of the artifact and the path to the files you want to upload. Check it on the Marketplace here. - Storage: Uploaded artifacts are stored temporarily on GitHub's servers associated with the workflow run. They are accessible for the duration of the workflow run and can be downloaded or used in subsequent steps within the same workflow.
- Artifact Retention: Uploaded artifacts are retained for a limited period of time, typically until the workflow run is completed or until a maximum storage duration is reached. GitHub provides options to control artifact retention and cleanup policies.
- Downloading Artifacts: Users can download artifacts associated with a specific workflow run directly from the GitHub web page interface under the Actions tab. This allows for easy access to build artifacts or other files generated during the workflow execution.

actions/upload-artifact actionOverall, uploading artifacts in GitHub Actions facilitates the sharing and storage of important files generated during workflow execution, enabling better collaboration and visibility within software development projects or letting users download software for releases.
Edit the workflow.yml as well to add the deliver-jar job and push it and the Dockerfile to your repository:
name: Pipeline

on:
  push:
    branches: [ main ]

jobs:
  build-and-test:
    runs-on: ubuntu-latest
    steps:
      - name: Checkout repository code into runner
        uses: actions/checkout@v2
      - name: Set up JDK 11
        uses: actions/setup-java@v2
        with:
          java-version: '11'
          distribution: 'adopt'
      - name: Test with Maven
        run: mvn test -B

  deliver-container:
    runs-on: ubuntu-latest
    needs: build-and-test
    steps:
      - name: Checkout repository code into runner
        uses: actions/checkout@v2
      - name: Set up JDK 11
        uses: actions/setup-java@v2
        with:
          java-version: '11'
          distribution: 'adopt'
      - name: Build the JAR file with Maven
        run: mvn package -B
      - name: Build the Docker image
        run: docker build -t ${{ secrets.DOCKERHUB_USERNAME }}/java-console-test:latest .
      - name: Log in to Docker Hub
        uses: docker/login-action@v1
        with:
          username: ${{ secrets.DOCKERHUB_USERNAME }}
          password: ${{ secrets.DOCKERHUB_PASSWORD }}
      - name: Push the image to Docker Hub
        run: docker push ${{ secrets.DOCKERHUB_USERNAME }}/java-console-test:latest

  deliver-jar:
    runs-on: ubuntu-latest
    needs: build-and-test
    steps:
      - name: Checkout repository code into runner
        uses: actions/checkout@v2
      - name: Set up JDK 11
        uses: actions/setup-java@v2
        with:
          java-version: '11'
          distribution: 'adopt'
      - name: Build the JAR file with Maven
        run: mvn package -B
      - name: Upload the JAR file to GitHub as an artifact
        uses: actions/upload-artifact@v4
        with:
          name: zipped-project-jar-file
          path: target/*.jar
The new knowledge here concerns the artifact uploading:
name: Upload the JAR file to GitHub as an artifact- This step utilizes the
actions/upload-artifact@v4action to upload the JAR file generated in the previous step as an artifact. withsection:name: zipped-project-jar-filespecifies the name for the artifact that will appear in GitHub.path: target/*.jarspecifies the path to the JAR file(s) that need to be uploaded as artifacts. The*.jarwildcard ensures that all JAR files in thetargetdirectory are included, which in our case is only one.
- This step utilizes the
After a successful run of our entire workflow pipeline the resulting GitHub Actions tab of the repository will look like this:
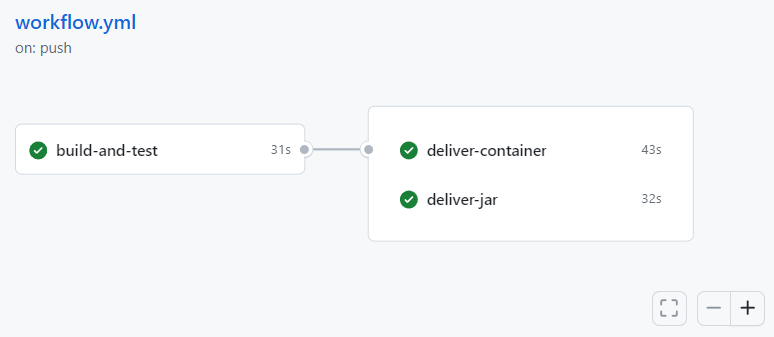
Notice that both the deliver-container and the deliver-jar jobs run in paralell, as they both start when the build-and-test job completes successfully thanks to needs: build-and-test.
When you scroll down the GitHub Actions tab -> 🏚 Summary page of this workflow pipeline run you can find the uploaded artifact:
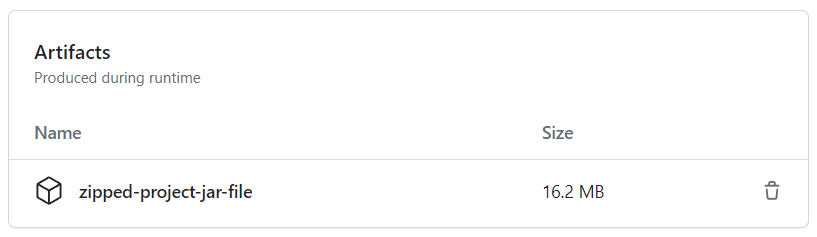
.jar file of the application in a .zip fileDownload the .zip file and unpack it. Then try to run the JAR file again using java -jar.
As you can see this is a way to deliver software differently than with a container.
At this point we have covered all the steps of the DevOps lifecycle until the final two steps: Operate and Monitor.
Time to close off with a last bit of humor, from Interview with Senior Java Developer: