🕹 Challenges & Exploration
You as a student need to fill in these assignments and learning goals by yourself. At the start of each next chapter the lecturer will, together with class, review these in an overall sense but will not give the full, word-by-word, solution for you to simply sit back and download. So it is important that you have completed the work yourself before the review starts in class and you can correct where needed.
You are not allowed to use AI like ChatGPT or Bing Copilot on the exam, but you are here! Leverage these new tools to speed up and give structure to your notes and documents. For example, ask to put material in Markdown format!
📝 After completing these challenges, you should be able to:
Docker networks:
- Define and explain which Docker networks there are, how they are different and what they are used for.
- Give examples of common commands and options to create, list, inspect, connect, disconnect, and remove networks, and to start a container with a network.
- List the steps to create a Docker network and run a WordPress container and a MySQL or MariaDB container using environment variables and a volume to store the data.
Docker Compose:
- Describe a given Dockerfile and how it would work.
- Type out a Docker Compose file when given instructions and the names of Docker images, ports, environement variables, volumes, networks... that need to be included in that Docker Compose file
- Explain how scaling works via the
docker-composecommand and how you can make sure there are no port conflicts - Explain how Docker networks work when defined in a Docker Compose file
- Explain what
depends-on:does in a Docker Compose file and how it is useful
🔰 Starting off simple
Transform the Docker commands belonging to Chapter 2 into Docker Compose docker-compose.yml files and test them:
1. Nginx:
docker run -d --name mynginx2 -p 8081:80 nginx:latest2. Grafana:
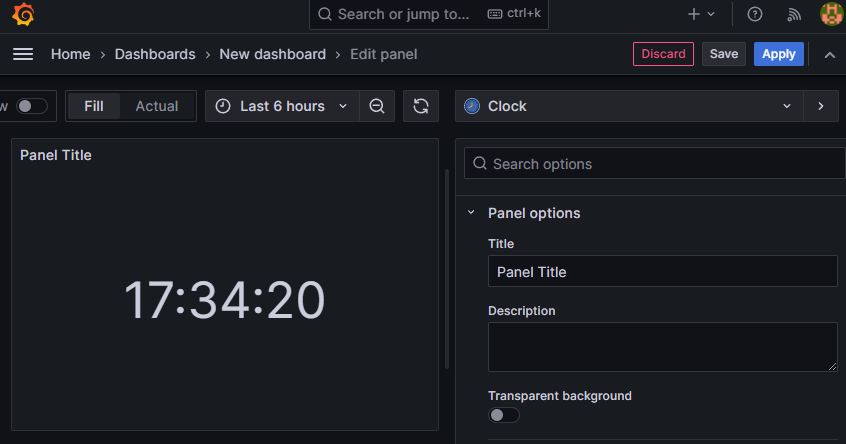
Start up a Grafana container (official image page) and make sure that you use environment variables in the Docker Compose file to:
- Set the admin password to abc132
- Install the Clock Panel Plugin for Grafana plugin
- Install the Infinity plugin
- Make sure the container always restarts unless it is manually stopped
After that login to the Grafana instance create a dashboard with a clock panel from the Clock Panel Plugin as a try-out.
🚀 Scaling with one command
During the Scalability and Flexibility 🚀 section of this chapter we mention being able to scale with one command. Time to put that to the test.
Get to know the image you will be scaling and run the https://hub.docker.com/r/dockercloud/hello-world image with a docker run command. Then put it in a docker-compose.yml file like this:
version: '3'
services:
  web:
    image: 'dockercloud/hello-world:latest'
    ports:
      - "80"
Notice that we only defined the container port, this will make Docker assign a free host port to it automatically. Deploy the Docker Compose file and check via which localhost port you can view the page.
🛠 Now look up and find a way to:
- Scale the
webservice of the Docker Compose deployment to 5 instances. Try to connect to each one and view the page they're hosting.
🗃 Going for Volumes
Look up how to define Volumes in Docker Compose files. You can also check the official documentation.
Then transform the Docker commands belonging to Chapter 2 into Docker Compose docker-compose.yml files and test them:
1. MYSQL with Named Volumes:
Start up a MySQL container (official image page) and make sure that you the Docker Compose file to also:
- Set the root password
- Create a volume in the command to make sure that the data get written to that volume instead of keeping it in a container. Once again, the type of volume you will be using here is called a named volume.
2. Mattermost with Host Volumes:
Mattermost is a messaging platform that can run in docker containers. It also has a mattermost-preview container version for users to test the software.
Start up a Mattermost preview container (official image page) and make sure that you use the Docker Compose file to also:
- Enable a log file
- Set a log file location
- Create a volume in that mounts a local folder on your computer to a volume that corresponds to the log file location folder. The log file will now be written to this local folder on your laptop instead of into the container. Once again, the type of volume you will be using here is called a bind mount/host volume.
🛠 Connecting peop... containers - Docker networks
We said before that containers are isolated. That is until you connect them to a network with Docker networks.
Start from this article And look up what:
- Which types of Docker Networks there are and why they are used
- The way of working is to connect containers with a bridged network
Also look at the Basic Docker Networking Commands section of this article. You can ignore the parts about Docker Compose for now.
![]() WordPress is a web content management system (CMS) that allows you to create and manage different types of websites, such as blogs, eCommerce stores, portfolios, forums, and more. WordPress is free, open-source, and easy to use.
WordPress is a web content management system (CMS) that allows you to create and manage different types of websites, such as blogs, eCommerce stores, portfolios, forums, and more. WordPress is free, open-source, and easy to use.
It is also available in a container version, however it requires a database to run. A perfect opportunity to do both with containers.
Create a briged Docker network for the two containers to connect to.
Start up a MySQL container (official image page) with a volume and all the settings needed to connect to a WordPress container via enviroment variables:
- Create a root password, or a superuser username and password combination
- Create a named database from the start of the container

Start up a Wordpress container (official image page) and make sure that you use environment variables in the command to connect to the right dbhost, username, password and database.
If all of it went right you can now connect to the WordPress container via the browser and start the set-up.
Look up how to define Docker Networks in Docker Compose files and how to let the different containers in the deployment correctly communicate with eachother. You can start from this tutorial and work towards the "Dividing containers into custom networks" part.
1. An API and a Database
You will be deploying the following architecture with Docker Compose:
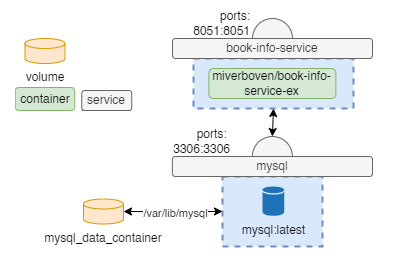
Two containers are involved here. Please check out the Docker Hub pages for more information on environment variables:
Below is the partial docker-compose.yml file you will need to use.
version: '3'
services:
 mysql:
  image: mysql:latest
  ports:
    - 3306:3306

 book-info-service:
  depends_on:
    - mysql
  image: miverboven/book-info-service-ex
  ports:
    - 8051:8051
  links:
    - mysql
  environment:
   MYSQL_DB_USERNAME: root
   MYSQL_DB_HOST: mysql
You can see that:
- a default network is used
- the required database hostname of the
book-info-service-excontainer image is set to the service name ofmysqlso it will try to connect to that within the Docker network
Still add the following parts to this docker-compose.yml file:
- use
depends-on:to make sure thebook-info-servicecontainer only starts when the MySQL container is running. - create the volume for the MySQL container.
- set up the matching password for the
mysqlandbook-info-serviceusing environment variables.
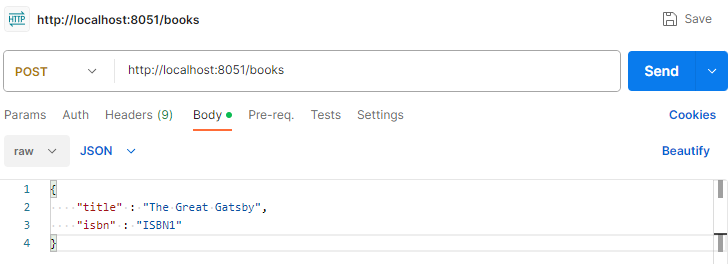
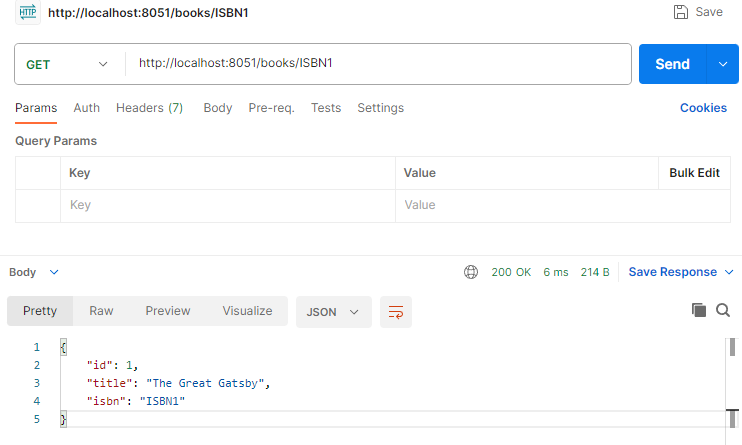
Deploy the docker-compose.yml file and test your deployment out by doing the following using Postman:
- Perform a
POSTrequest tolocalhost:8051/books/with the body:
{
    "title" : "The Great Gatsby",
    "isbn" : "ISBN1"
}
- Perform a
GETrequest tolocalhost:8051/books/{ISBN}with{ISBN}beingISBN1
Then when you're more confident, transform the Docker commands belonging to Chapter 2 into Docker Compose docker-compose.yml files and test them:
2. Wordpress, again
![]() WordPress is a web content management system (CMS) that allows you to create and manage different types of websites, such as blogs, eCommerce stores, portfolios, forums, and more. WordPress is free, open-source, and easy to use.
WordPress is a web content management system (CMS) that allows you to create and manage different types of websites, such as blogs, eCommerce stores, portfolios, forums, and more. WordPress is free, open-source, and easy to use.
It is also available in a container version, however it requires a database to run. A perfect opportunity to do both with containers, and now one single Docker Compose file:
Start a MySQL container (official image page) with all the settings needed to connect to a WordPress container via enviroment variables:
- Create a root password, or a superuser username and password combination
- Create a named database from the start of the container with environment variable
MYSQL_DATABASE
Start up a Wordpress container (official image page) and make sure that you use environment variables in the command to connect to the right dbhost, username, password and database.
Create a briged Docker network called wp-net for the two containers to connect to.
If all of it went right you can now connect to the WordPress container via the browser and start the set-up.
🛠 When this works:
- update the
docker-compose.ymlfile the MySQL container gets a a named volume - use
depends-on:in thedocker-compose.ymlfile where applicable
Then redeploy the Docker Compose file.