
📝 After completing this theory chapter, you should be able to:
- Explain what DevOps is in a nutshell
- Describe the DevOps lifecycle in general and why it is formed into an infinity sign
- Explain what GitHub Actions is as a DevOps tool and how it works in general
- Describe the different parts and keywords of a .yml workflow file in detail
- Describe how the Plan Code Test Release Deploy steps of the DevOps lifecycle are reflected in the tools and the workflow pipeline file
- Explain what Continuous Integration / Continuous Delivery / Continuous Deployment is and when a pipeline reaches these points
DevOps? Developers? Operations?
DevOps is a set of practices, tools, and a cultural philosophy that automate and integrate the processes between software development and IT operations/infrastructure teams. It emphasizes team empowerment, cross-team communication and collaboration, and technology automation.
The goal is to bridge the gap between IT operations/infrastructure and software development to improve communication and collaboration, create smooth processes and increase efficiency.
The DevOps lifecycle is all about agility and automation. It consists of eight phases representing the processes, capabilities, and tools needed for development (on the left side of the loop) and operations (on the right side of the loop). Throughout each phase, teams collaborate and communicate.
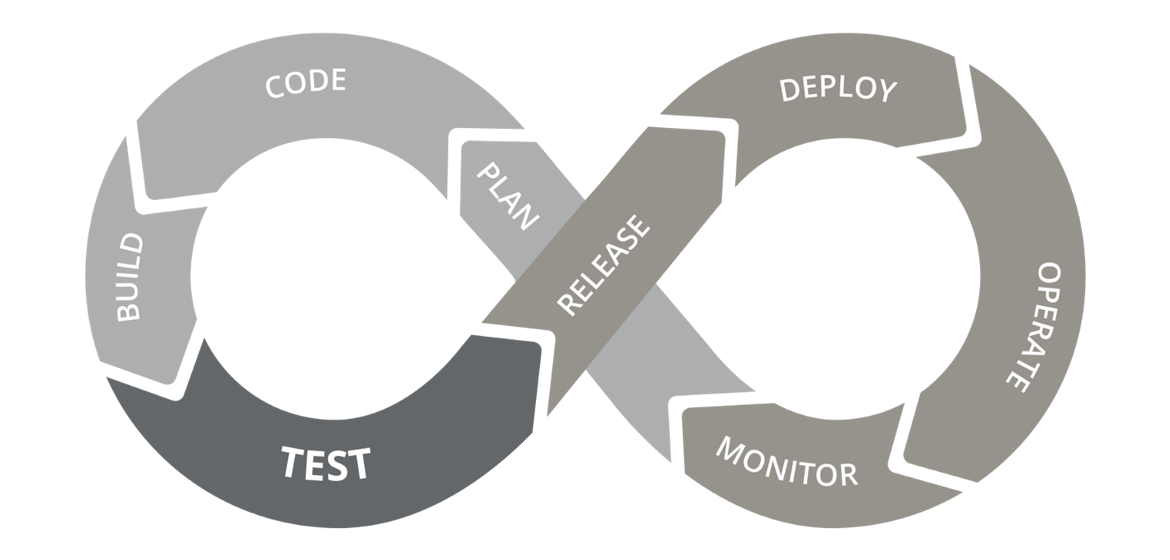
This DevOps lifecycle is supported by tools called pipelines or workflows that can automate and tie actions in the lifecycle together.
 Did you know that GitHub also has a feature that lets you automate various actions related to your repositories? This feature is called GitHub Actions. GitHub calls the files and the system you set up with these files, workflows. However, as we already stated they are more generally known as pipelines, devops pipelines or CI/CD pipelines. More about these names later.
Refreshing your Git and GitHub knowledge
Not sure about your Git and GitHub knowledge? Watch and follow this 25 minute tutorial to get back to the level of knowledge you should have after the previous semester. This knowledge is required to move on with this chapter!
♾ Your first DevOps workflow/pipeline
As a first test we will use GitHub Actions to create a simple workflow that will display the hostname of the machine that runs the workflow. This workflow will be triggered whenever you push any changes to your repository.
We will not relate it to the DevOps lifecycle just yet so we can concentrate on getting familiar with the tool first.
⚙ Setting it up
 To get started, you need to create a repository on GitHub that will contain your code and your workflow file. You can name your repository anything you want, but for this example, let's call it devops-test. To create a repository, follow these steps:
- Go to https://github.com/new and sign in with your GitHub account.
- Enter devops-test as the repository name and add a short description if you want.
- Leave the repository Public.
- Click Create repository.
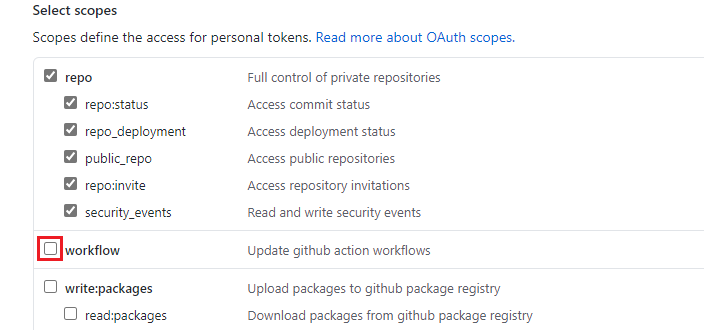
Then we will make sure we have the correct rights: We want to be allowed to push workflow describing files to our repositories. If you followed the Web Essentials course you have already created a personal access token. You will need to edit this token to give yourself extra rights:
- Go to your GitHub account settings and navigate to the "Developer settings" section.
- Click on "Personal access tokens."
- Find the Personal Access Token you are using to access GitHub.
- Make sure this access token has the appropriate permissions. In this case, the access token must have the workflow scope. If the access token does not have the correct permissions, edit the access token and add the workflow scope.
Now that you have created your repository and edited your rights if needed, you need to push files to it.
Create the following folders and files on your laptop:
📂devops-test
├── 📄README.md
└── 📂.github
    └── 📂workflows
└── 📄workflow.yml- The
📄README.mdcan just have the following text:
# Testrepository for my first workflows

Here I will just test my workflows- The
📄workflow.ymlfile is a YAML file that defines the steps and commands that will be executed automatically by GitHub Actions. You can create and edit your workflow file using any text editor or IDE that supports YAML syntax.
Visual Studio Code
![]() A good tool to use is Visual Studio Code (VSCode). This is a powerful and versatile source code editor offering features like syntax highlighting and debugging tools, making coding more efficient. With a wide range of extensions available, it can be customized to suit different programming languages and workflows. Its user-friendly interface and frequent updates make it a popular choice among developers.
A good tool to use is Visual Studio Code (VSCode). This is a powerful and versatile source code editor offering features like syntax highlighting and debugging tools, making coding more efficient. With a wide range of extensions available, it can be customized to suit different programming languages and workflows. Its user-friendly interface and frequent updates make it a popular choice among developers.
For this example, you already have a workflow file that you can copy and paste. The workflow file is:
name: Display hostname

on: push

jobs:
  display-hostname:
    runs-on: ubuntu-latest
    steps:
      - name: Run hostname command
run: hostnameNow push the contents of the devops-test folder code to the devops-test repository you created before and view your repository on GitHub.

You can see the running or completed workflow under this Actions tab of the repository. The yellow circle indicates this workflow run is still going on.
Click on the name of the run for more details on each job included in the run.
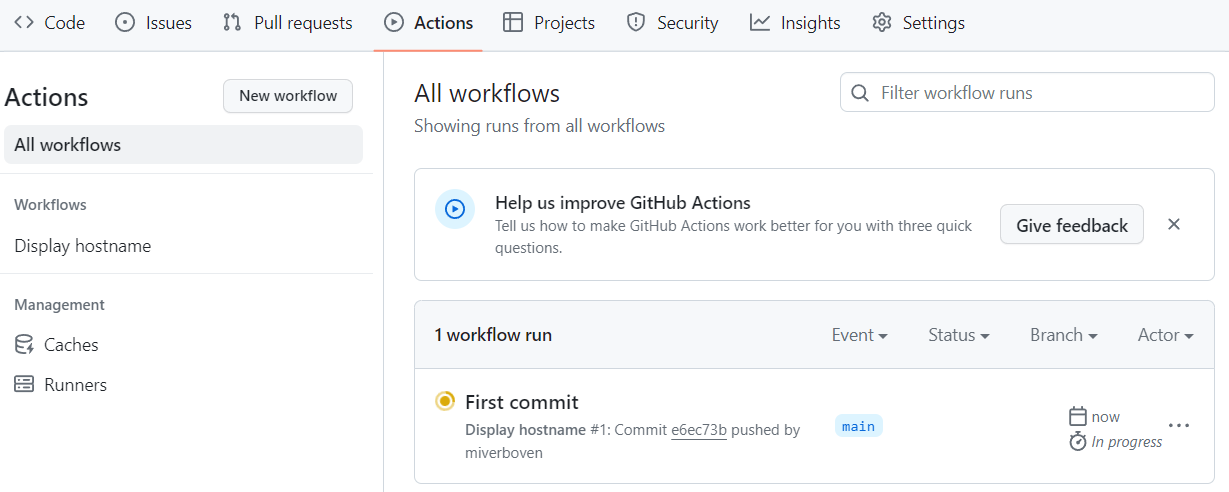
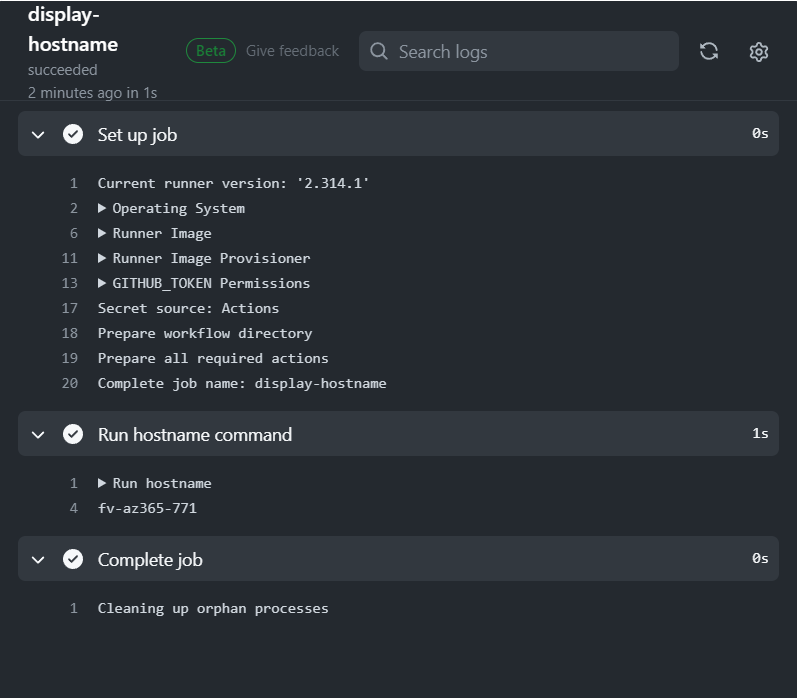
You can see that our workflow only has one job at the moment. The green checkmark indicates that the job has completed. Click on a job to look at it in more detail.

You can see exactly what happened in each step.
Let's now look in detail what happened before and during the workflow.
ℹ Analyzing what happened
We will go over the steps in the system of the workflow as they happened one after the other.
Step 1: GitHub looks for a .yml file in the .github/workflows folder
📂devops-test
├── 📄README.md
└── 📂.github
    └── 📂workflows
        └── 📄workflow.yml <---
Step 2: GitHub checks if it needs to run the workflow in the .yml file
name: Display hostname

on: push

jobs:
  display-hostname:
    runs-on: ubuntu-latest
    steps:
      - name: Run hostname command
run: hostnamename: The name of the workflow that will appear on GitHub when you view the actions tab or the workflow runs. You can choose any name that is descriptive and meaningful for your workflow.on: The event that will trigger the workflow to run. You can specify one or more events, such as push, pull_request, issue, etc. You can also filter the events by branch, tag, path, etc. For example,on: pushmeans the workflow will run whenever you push any changes to your repository.
Step 3: GitHub creates a temporary virtual machine in the cloud for the first job of the workflow
A workflow is always made up of jobs. Each seperate job is run in a runner virtual machine that gets started up in the cloud by GitHub:
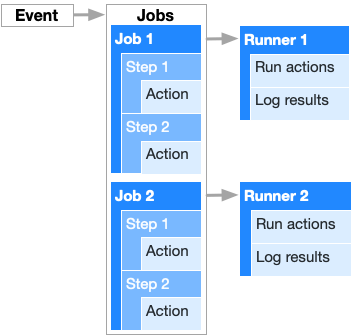
on: an event and that has two jobs. The steps of each of these jobs gets run in a runner virtual machine started up in the cloud by GitHubname: Display hostname
on: push
jobs:
display-hostname:
runs-on: ubuntu-latest
steps:
- name: Run hostname command
run: hostname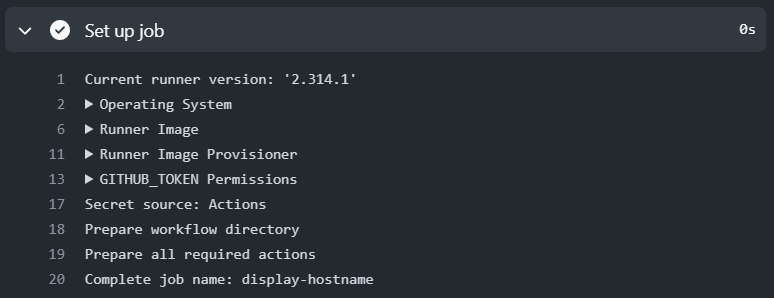
jobs: The collection of tasks that will be executed as part of the workflow. You can define one or more jobs, each with a unique identifier. You can also specify the dependencies, concurrency, and timeout for each job. For example,jobs: display-hostnamemeans the workflow will have one job named display-hostname.runs-on: The type of runner that the job will run on. A runner is a machine that executes the workflow steps. You can use a hosted runner provided by GitHub, or a self-hosted runner that you manage yourself. For example,runs-on: ubuntu-latestmeans the job will run on a Linux machine with the latest Ubuntu version.
Step 4: GitHub runs every step of the job in the virtual machine
name: Display hostname

on: push

jobs:
  display-hostname:
    runs-on: ubuntu-latest
    steps:
      - name: Run hostname command
        run: hostname
steps: The sequence of commands that will be executed as part of the job. You can define one or more steps, each with a name and a command. For example,- name: Run hostname commandmeans the job will have a step named Run hostname command.run: The command that will be executed by the runner virtual machine's shell. You can use any shell command that is supported by the runner virtual machine's operating system. For example,run: hostnamemeans the step will execute the hostname command and display the name of the machine.
Step 5: GitHub destroys the virtual machine again after all steps of the job are over and starts with the next job

Now you have an idea how GitHub Actions works as a tool making DevOps pipelines/workflows possible. Next we can start making an actual example of it being used to support the DevOps lifecycle.